Chimney passage through the roof
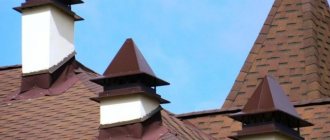
Heating units operating on solid, gas or liquid fuels are equipped with a flue duct for the removal of combustion products. Increased requirements are imposed on the functionality and safety of chimneys, since due to the use of low-quality materials for their installation or violation of technology and SNiP norms, the structure itself may collapse, and a fire may occur. Particular care should be taken to equip the passage through the roof for the chimney to ensure waterproofing and fire safety of the unit. Let's consider how to properly carry out the passage of the smoke channel through the roofing system.
Smoke channel passage
Consequences of poor-quality installation
The passage assembly must be reliably protected from moisture penetration, therefore, it is of great importance to comply with the technology of installation work, the use of reliable and durable materials. Poor waterproofing of roof pipes
:
- Leads to the destruction of the brickwork of the chimney due to the weakening of the solution, as a result of which flue gases can penetrate into the attic. The fire hazard also increases.
- It provokes the penetration of moisture into the brick chimney and the appearance of fungus in the warm season.
- Promotes waterlogging and damage to waterproofing carpet and vapor barrier membrane.
- Increases the heat loss of the building (correspondingly, fuel costs increase).
- It disrupts the air circulation in the room under the roof, this leads to an increase in the level of humidity and provokes decay of wooden structures. In difficult cases, this leads to the need for overhaul of the roof system of the house.
- It causes the formation of ice deposits that cause the expansion of cracks and the destruction of the roofing next to the chimney.
Chimney location and height
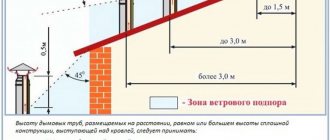
In order to ensure optimal draft force for efficient combustion of fuel, the total length of the flue duct should be between 5 and 10 meters. The height of the location of the upper edge of the chimney relative to the ridge of the roof or the wall of a higher building located in the immediate vicinity is also important.

Rules for the location of pipes on the roof
When designing the passage of the chimney through the roof, one should be guided by the current rules and regulations, fire safety requirements. Consider the following:
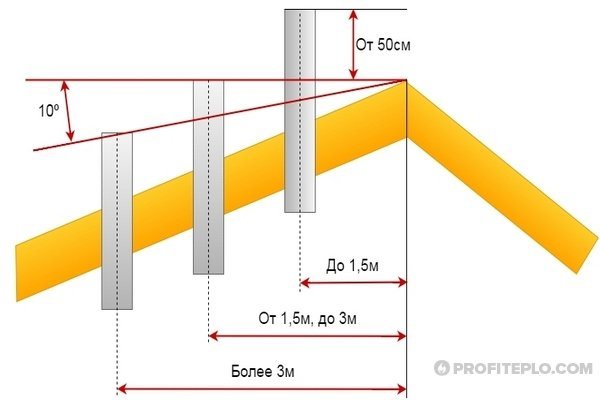
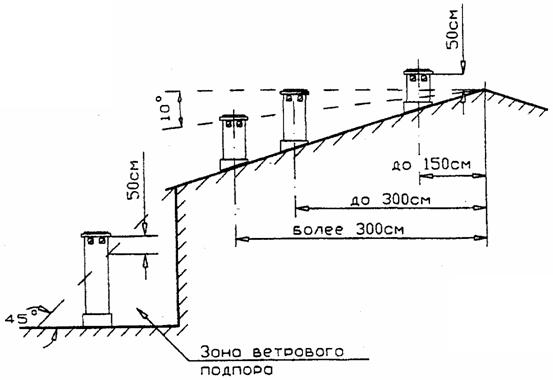
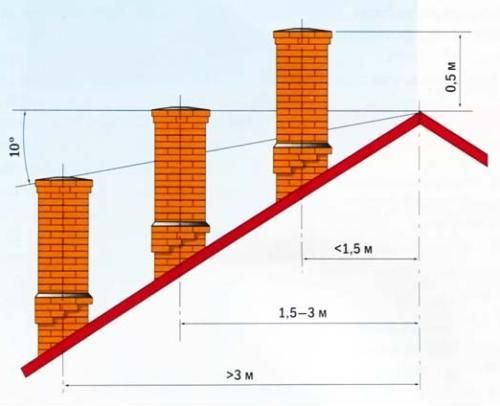
- The recommended place for arranging the chimney is at a distance of no more than one and a half meters from the highest point of the roof (ridge). In this case, the upper cut of the pipe must be at least 50 cm above the ridge.
- If the pipe is 1.5–3 meters from the ridge, its upper part may be at the level of the ridge. When the chimney is removed by more than three meters, its height above the roof is calculated depending on the height of the ridge. The top edge of the ridge should fall on an imaginary line drawn from the ridge at an angle of 10 ° relative to the horizontal line passing through the same point.
- The place where the chimney passes through the roof should be located between the rafters at a distance of at least 25-30 cm from the wooden elements of the roofing system. In the case of removing a part of the rafter, a special structure is mounted so that the roof frame can withstand operational loads.
- A gap of 13–25 cm should be left between the chimney pipe and the edges of the roofing, which is not resistant to fire (soft roof, roofing felt); if the roof is made of sheet metal, natural or cement-sand tiles, slate, this distance can be reduced to a minimum.

Pipe in the valley
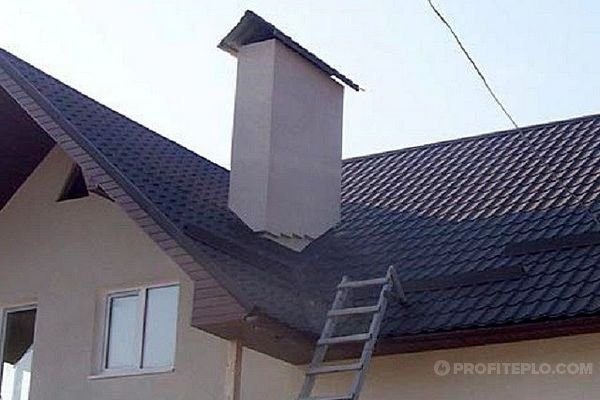
It is not recommended to install the chimney in the place where the complex roof valley is located. Precipitation flows down it, which flows here from two slopes, in addition, snow masses will accumulate near the chimney and melt.The increased load inevitably leads to depressurization of the joints of the penetration and the roof, they will have to be regularly checked and repaired.
Installation of sandwich pipes through the roof
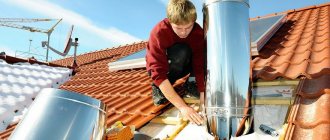
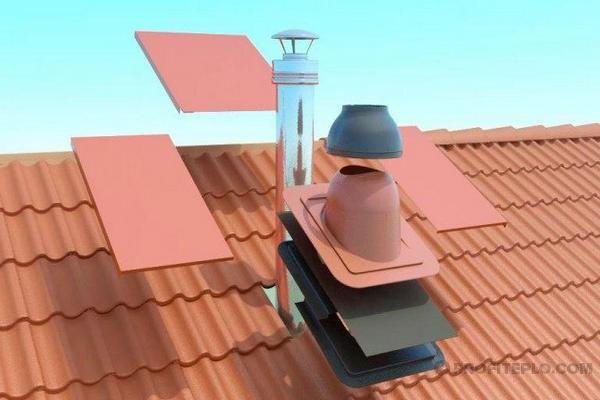
Roofing is considered the most difficult stage of installation. This will require a special part - a roof cut. It protects the roofing cake from contact with the pipe. When choosing this part, it is necessary to take into account the slope of the roof, the standard cut is available for roofs with a slope of 15 to 55 °. The first stage is marking the place where the chimney should exit through the roof. Then, according to these marks, a hole is cut through which the pipe must pass freely.
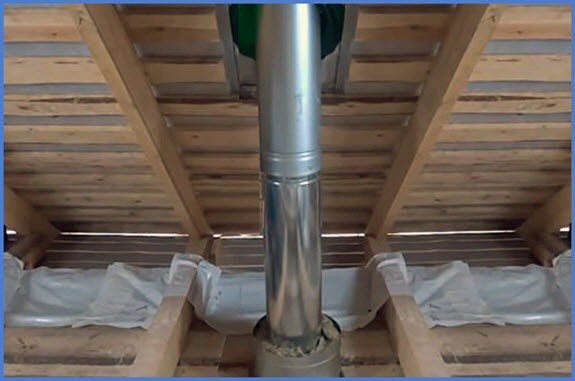

The second stage - a galvanized sheet is attached from the inside, and a roof cut on the outside. The cutting edges are inserted under the roofing material or ridge. To increase the tightness between the pipe and the cut, a special apron is used, which can be adjusted.
Now you can install the next chimney element and build it up to the desired height. The final stage is the installation of a spark arrester, a fungus, a weather vane, etc. on the top of the pipe.

Fire safety
The wooden truss system and some layers of the roofing cake (waterproofing, vapor barrier) do not withstand heating and can ignite or melt. The safety of system elements that do not differ in fire resistance is ensured by installing a special box around the perimeter of the hole in the roof.
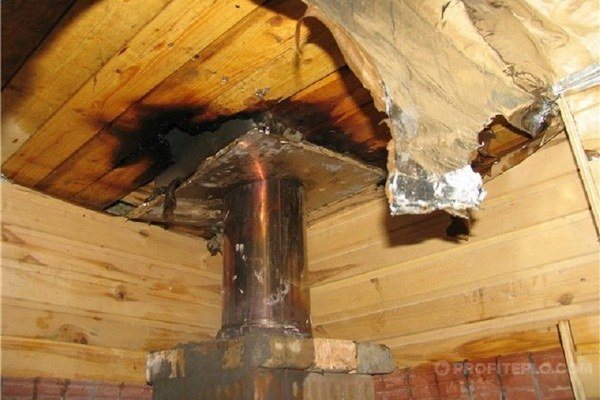

Violation of safety rules
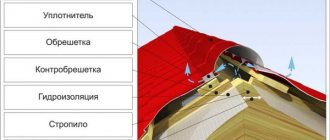
The box is mounted from a wooden block, it should be located flush with the crate, on the outside of the roof. Along the perimeter of the box from the outside, the edges of the vapor barrier are fixed - a carpet made of roofing material or other waterproofing material, as well as the edges of the vapor barrier membrane from the side of the room, if we are talking about an insulated roof. In both cases, a cross-shaped incision is made in the panel and triangular fragments of material are tucked inward. For fastening, nails with wide heads or staples are used, and a sealant or adhesive tape allows you to achieve the tightness of the abutment of the materials along the perimeter of the wooden box.
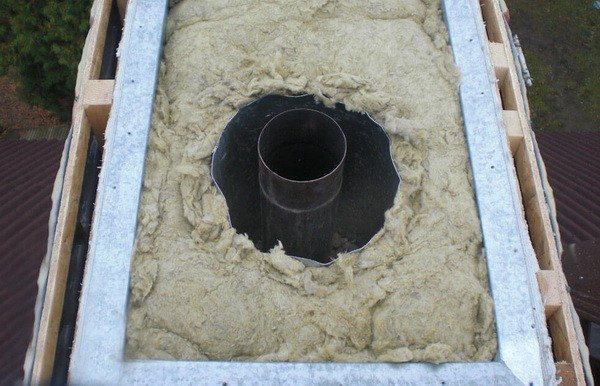
The passage through the roof of the chimney provides for thermal insulation of the chimney with basalt wool or other non-combustible materials. If possible, an air gap of 5-7 cm wide is left between the layer of insulation and the chimney itself.

Box insulation with basalt wool
If the installation of the chimney involves the use of a special element - penetration, when choosing it, first of all, make sure that the element is made of a material that is resistant to temperature extremes.
Please note: Do not use materials that are not designed for high temperatures, such as pipes and roof penetrations for ventilation ducts.
Rectangular or square tube
The brick chimney of a classic stove usually has a rectangular or square section, since this is the simplest form for installation. The outer casing of the ceramic stove chimney looks similar.
In the standard version, the chimney is located strictly vertically, but on the ceiling of the attic, you can equip a horizontal section of a small length in order to adjust the place where the chimney exits to the roof.
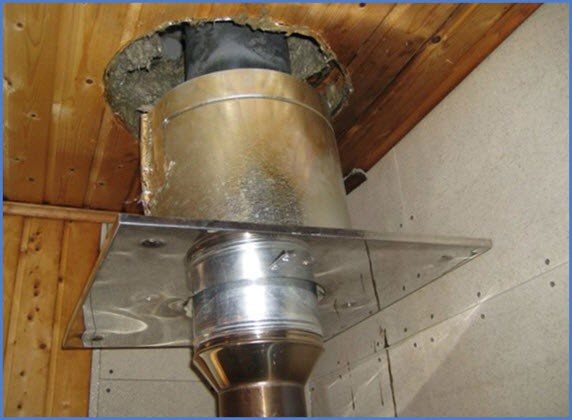
A hole is cut in the roofing pie and the wooden structure mentioned above is mounted. After the laying of the pipeline passing through the roof is completed, it is necessary to ensure reliable protection of the passage unit from atmospheric precipitation. From the inside, from the side of the attic, a steel sheet is attached to decorate the penetration site (a hole in it is cut to fit the size of the pipe, the sheet is put on the chimney in advance). The protective and decorative plate is attached to the edges of the support box with self-tapping screws, the joint along the pipe perimeter is filled with a fire-resistant sealant.The box is lined with asbestos sheets from the inside, or the gap between it and the pipe is filled with basalt wool.

Rectangular pipe
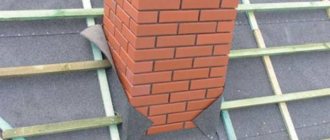
From the outside, the edges of the waterproofing are brought onto the brick pipe, in which a cruciform incision was previously made. Each of the resulting triangles is cut so that the overlap on the chimney wall is 10–12 cm. Waterproofing is glued to the brick using a special material - an elastic metallized tape with an adhesive layer.
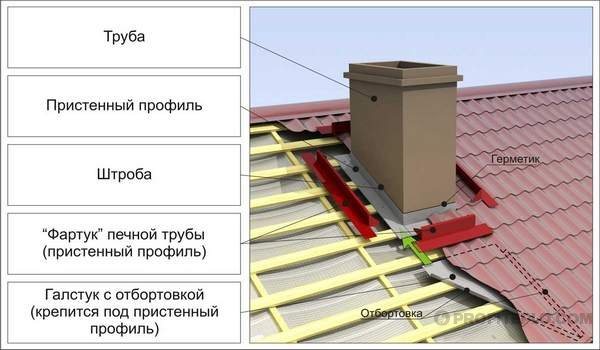
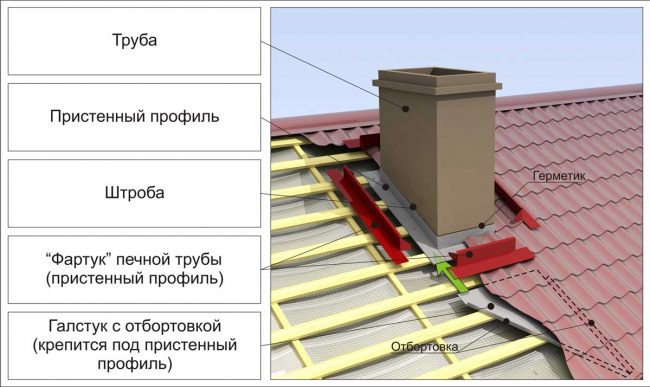
Then the inner apron is mounted. The structure consists of four galvanized steel strips. The upper folded edge of each plank is inserted into a brickwork, and not into a masonry seam. In the corners, the strips are joined with a 15 mm overlap. All joints are treated with a heat-resistant sealant. The side strips should be provided with bumpers that direct the flow of water downward. A metal sheet with sides is put under the lower bar - a tie, which provides water drainage to the lower edge of the roof or to the nearest valley.
To decorate the chimney through the roof, an external apron made of galvanized sheet metal is installed. The material can be painted in the color of the roof. The method of fastening is the same as for the internal structure, but you can do without the punishment by treating the joint with a heat-resistant sealant for external work. The edges of the apron, laid on top of the roofing, are fastened with galvanized self-tapping screws.
Chimney
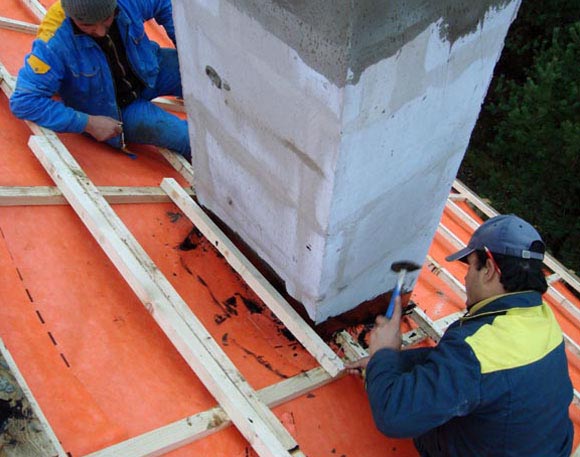
- To lead the rectangular chimney box to the roof, it is necessary to make a corresponding hole at the installation site. Previously, a roofing cake is removed on the selected area - a finishing soft coating and underlying layers. In this case, the roll cover should go 150 mm along the perimeter into the prepared cell. The cover is scored and folded back - these free edges will then be attached to the vertical walls of the penetration. A rectangular hole of the required size is made in the concrete. A formwork is installed along its edge and a vertical rectangular side with a height of 150 mm above the roof carpet is poured along the perimeter.
After the concrete gains strength, the formwork is removed, and a pre-bent roll covering is attached to the outer sides of the side. To prevent peeling of the roofing material from the sides of the side, a metal strip is mounted along its edge using dowels. After installing the chimney box, it is important to waterproof the joint between the box and the concrete side. For this, an outflow with a drip made of roofing sheet is mounted on the abutment of the end of the side with the walls of the chimney.
- It is easier to mount a brick chimney on the roof. In this case, the pouring of a special side is not required: the brick structure passes through a prepared hole in the concrete floor, and the flaps of the soft roof are mounted directly to it, after which an apron made of galvanized is installed on top.

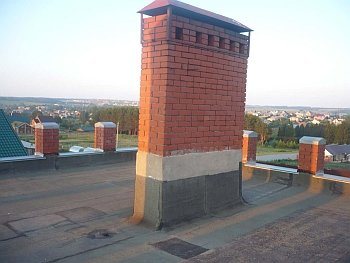
At the required height along the perimeter of the chimney, a horizontal groove with a depth of 15 mm is made. It should be done in the brick, not in the assembly seam. The upper edge of the metal apron, bent inward, is inserted into the strobe. Then the strobe must be filled with construction sealant.
How to fix the chimney on the roof? On the chimney from the inner side of the roof, it is required to mount a flange that is rigid enough to take the loads from the crate - the chimney outlet forces part of the girders to be dismantled, and without installing the flange, the structure will remain in a suspended state.
The flange is usually a steel sheet with stiffeners welded to it. The sheet thickness should be at least 2-3 mm. A non-combustible heat insulator - basalt cardboard should be laid on the flange. This will prevent heat transfer from the chimney to the battens.If the chimney structure is not reliable enough to take on some of the loads on the roof, a rafter structure or additional posts are mounted around the perimeter of the hole so that the load is transferred to the attic floor.
Around the pipe, all layers of the roof must be cut to a gap corresponding to the standards specified in SNiP (depending on the type of pipe and the degree of its heating). The resulting gap must be filled with a non-combustible heat insulator - basalt or glass wool, basalt cardboard.
The principle of sealing the abutment of the roofing material to the chimney depends on factors such as:
- sectional shape of the pipe;
- material of manufacture and coating of the chimney;
- the location of the pipe outlet on the roof.
To ensure that the chimney led out through the pitched roof is not damaged by snow melting, it is recommended to install snow holders higher up the slope. If the chimney width (across the slope) is over 800 mm, a special structure should be mounted on the slope above it, which diverts the water flow.
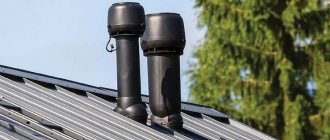
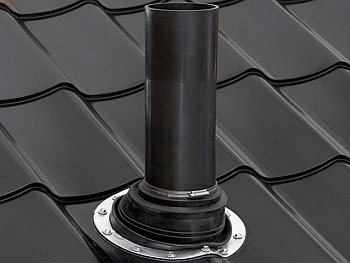
It is very difficult to waterproof the junction of the roof to a circular pipe without using special roof penetrations. The construction market offers a wide selection of pipe assemblies that differ in diameter and material of manufacture.
A universal option is an aluminum flange fitted with a silicone or rubber bellows. Several standard sizes of these elements are available, so you can choose a penetration for a chimney of any popular diameter. The flange face is covered with a material similar to that of the corrugation and is grooved for filling with a sealant.
The top of the corrugation cone is cut to the required diameter, after which the penetration must be pulled over the chimney. The flange must be coated with sealant and attached to the roof with self-tapping screws that are included in the kit. If the roof covering is not made of metal, the flange is attached with dowels or long self-tapping screws directly to the batten.
For roofs with different slopes, penetrations are offered in which the corrugation is located at different angles to the flange. You can purchase a split design, which is used if it is not possible to pull the corrugation onto the pipe due to the presence of protruding parts or the high height of the mounted chimney. Such a penetration is equipped with clamps, due to which the corrugation is tightly squeezed around the pipe.
Fastening the chimney to the roof can be performed using penetrations, in which a hinge segment is used instead of a corrugation. This is a universal option for roofs with any slope of the slope: the surfaces of the docking elements are spherical and can be fixed relative to each other at any angle.
It is not uncommon for roofing material manufacturers to offer prefabricated chimney penetrations with a pre-formed flange for the appropriate roof covering. Such a penetration is attached to the roof lathing with the necessary overlap. To achieve the same diameters, the apron cone is cut off. Passages from roofing manufacturers have several standard slope angles. To seal the joint, a second conical apron is mounted overlapping the first.
Functions
The functions of the chimney are quite clear: it allows you to divert combustion products outside the house. The exit of the pipe through the roof prevents them from reaching windows and balconies.
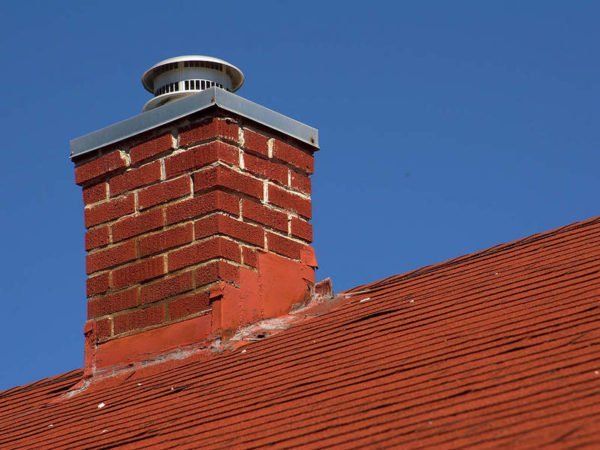

Chimney on the roof of a private house.
Installation
Key requirements for the design and installation of chimneys are set out in SNiP 41-01-2003. For the convenience of the reader, I will present them here.
A separate chimney is provided for each boiler or stove. The exception is two stoves located in the same apartment and on the same floor. They can use a common chimney.
| Thermal power, kW | Internal section of the chimney or channel, mm |
| 3.5 and less | 140x140 |
| 3,5 — 5,2 | 200x140 |
| 5,2 — 7,0 | 270x140 |
For a round pipe, the internal cross-sectional area should not be less than that indicated for rectangular pipes.
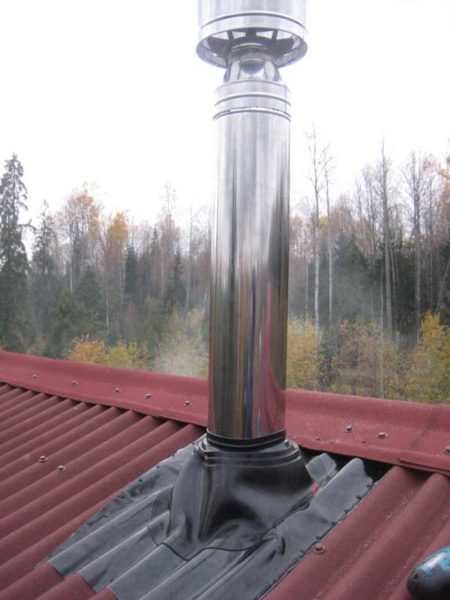

Chimney made of round stainless steel sandwich pipe.
The minimum height of the chimney from the grate of the furnace to the mouth is 5 meters. Less is impossible: in this case, there will not be sufficient draft in the chimney for its effective operation.
The height of the pipe above the roof must be equal to or greater than the following values:
- For a flat roof - 0.5 m;
- When located at a distance of 1.5 to 3 meters from the ridge of a pitched roof, the part of the pipe protruding above it should not be lower than the ridge. The same restriction applies to the parapet;
- If the chimney is 3 or more meters away from the ridge, it should not be lower than a line drawn from the ridge down at an angle of 10 degrees to the horizon.
Dependence of the height of the chimney on its location on the pitched roof.
The chimney material can be used:
- For a wood stove or boiler - clay brick, heat-resistant concrete, asbestos cement and a stainless steel sandwich pipe with non-combustible insulation between the walls. At the same time, the maximum permissible operating temperature is 300 C for asbestos cement and 500 for stainless steel;
- If coal is used as fuel, the pipe can only be made of brick or made of heat-resistant concrete.
The mouth of the pipe must be protected from precipitation, while the umbrella must not restrict the escape of smoke.
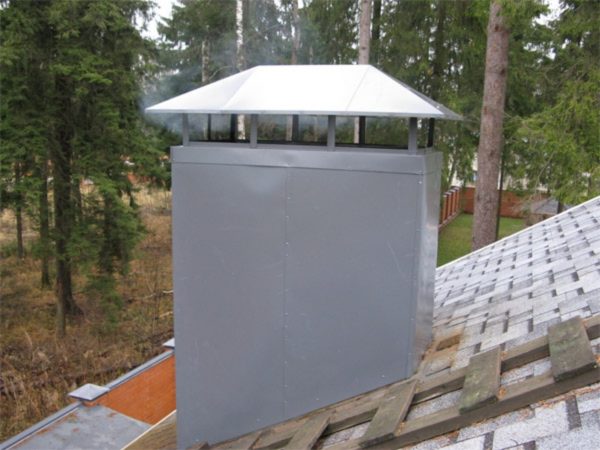

Umbrella over the chimney.
Cutting the pipe on the roof or in the ceiling (thickening of the brick chimney, providing the required degree of thermal insulation) should be 70 mm thicker than the pie of the roof, floor or ceiling. If the chimney is laid in a solid wall or partition made of combustible material, the cutting is performed to the full height and thickness of the partition. The gap between the groove and the wall is filled with a non-combustible material (usually basalt wool).
How to pass a pipe through a roof made of slate or profiled sheet?
It is produced between the rafters, at a distance of at least 15 cm from non-combustible supporting structures and at least 30 cm from combustible structures. A box is constructed around the chimney, which is sewn up from below with a sheet of galvanized iron lined with sheet asbestos. The box is filled with basalt wool or fine expanded clay.
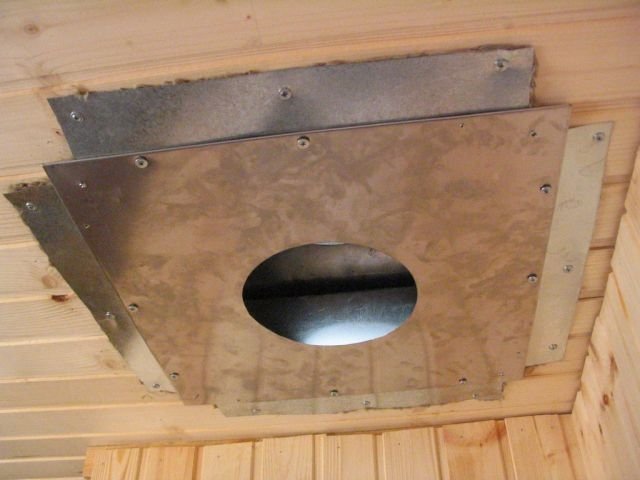

Chimney passage through the ceiling.
A hole is cut in the roofing material for the pipe. The slate is cut with a grinder with a stone or diamond disc, profiled sheet and metal tiles - with the same grinder, but with a metal disc.
How to bypass a pipe on a roof, making its connection to the roof airtight?
- From the pipe down the slope under the roofing material, but on top of the waterproofing film, a tie is laid - a galvanized sheet with a flange. Its upper edge is wound into a shallow groove in the chimney. At the bottom of the ramp, the tie opens into the gutter;
- Additional waterproofing of the pipe on the roof in the chimney along the perimeter of the chimney is performed with heat-resistant silicone sealant;
- Roofing material is laid on top of the tie with a minimum gap;
- The wall profile is installed last along the perimeter.
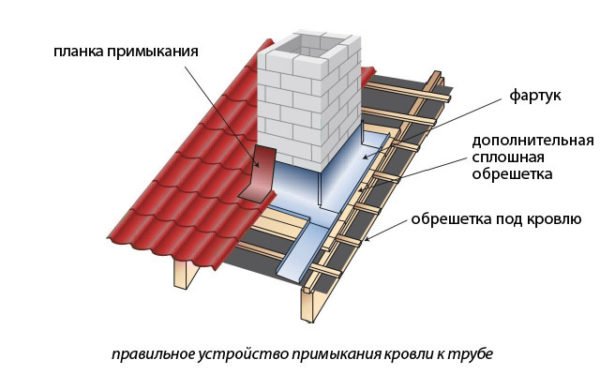

Bypassing the chimney on a metal roof.
Installing a sandwich pipe through a finished roof
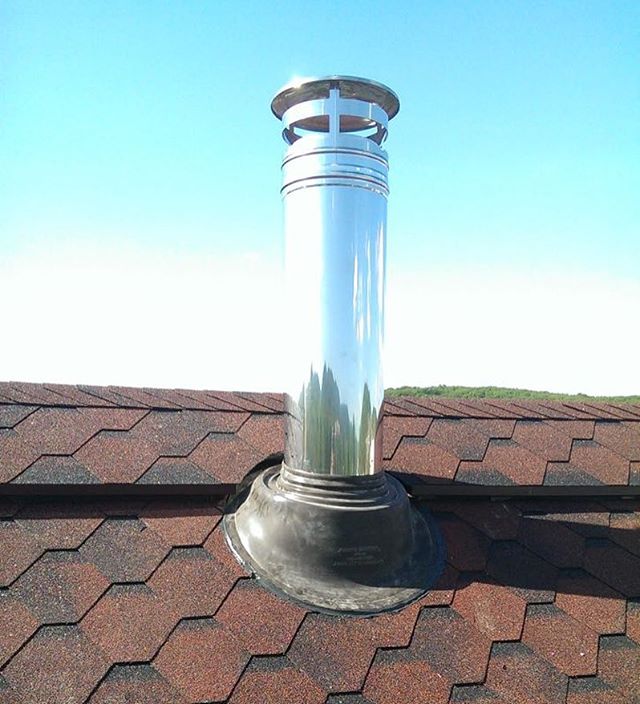

In the last few years, chimneys have been made using a sandwich pipe. People are attracted by its appearance, low cost and long service life.
An important condition is the ability to install a sandwich chimney with your own hands.
Installation of a vertical channel requires certain skills in the field of construction and knowledge of some of the nuances. However, with great diligence, such work can be done independently. The main thing is to figure out how to do it correctly, as well as observe safety precautions and fire safety standards.
Roof chimney installation
This is how brick pipes are arranged, but the installation of a sandwich chimney is often used in houses. Installation is done according to the worked out scheme:
- A ready-made transition piece is installed on the furnace hole.
- The first section is connected to it, the required length is taken to overlap from standard pieces of pipes.
- The product is mounted in the pre-installed factory passage assembly, then the sandwich pipe must be fixed on the roof.
- Outside, a master flush is attached or a galvanized steel lining apron is installed.
- The edge of the smoke channel is formed by a head.
How to lead a chimney through the roof
Such an operation requires a preliminary study of the location of the rafters and installed floor beams. The pipe should be between these parts. It is important that the outer wall of the flue duct does not touch the fuel element. In this case, it is necessary to maintain a minimum distance of 13 cm. Moreover, this part must necessarily have insulation. To fulfill this requirement, the pipe is often displaced in two places at an angle of 45 degrees.


A special hole is made in the ceiling, taking into account the fire safety requirements. The distance from the chimney should be more than 250 mm, and it is necessary to provide for the installation of thermal insulation on the ceiling.
To protect the edges of the hole, a fireproof material is used - minerite, which is fixed with ordinary nails or self-tapping screws.
Next, the sandwich construction is inserted vertically into the made box. The pipe does not need to be firmly fixed: it is enough to simply create a direction. 2-3 planks will keep it from falling, while the vertical movement will be completely free. This design is necessary so that the cylindrical product can move up or down. As the pipe heats up, it lengthens, which requires additional space and freedom of movement.
The remaining space is covered with basalt wool. You can cover everything with expanded clay or foamed glass granules.
Several years ago, ordinary sand was used for this purpose. However, over time, he began to get enough sleep through the available cracks. Today, this option has been completely abandoned.
The front side is wrapped in stainless steel. A non-combustible gasket is made under the sheet. Previously, asbestos was used for this purpose. Today, it is considered a carcinogen, because this material has been replaced with mineral wool.
But you can also use another method: close the edges of the hole with mineral wool and only then install the assembled pass-through unit made of stainless steel sheet.
After the pipe is brought into the attic, a hole is made through the roofing pie. Next, the waterproofing is cut crosswise. The resulting triangles are carefully wrapped, then fixed with a construction stapler. The opened crate must be cut, keeping a distance of more than 13 cm to the smoke channel.
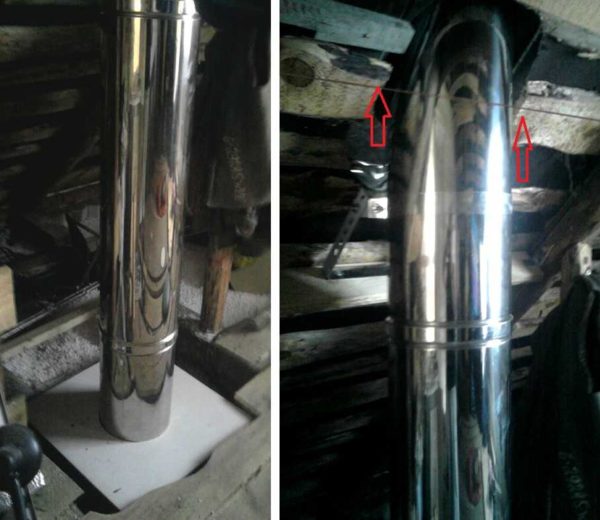
The photo, which shows the red arrows, shows an incorrect pipe passage through the roof. The segment separating the cylindrical part from the planks is insufficient in size. With the correct manufacture, the edges are trimmed with minerite, taking into account the requirements of fire safety. The next photo shows the correct passage.

Choosing a place for installation and outlet of the pipe
Pipe placement options
According to professionals, it is best to exit the pipe through the roof through the ridge, since in this place, perhaps, it is easiest to arrange a knot for adjoining the roofing to the pipe, and also thanks to this, you can avoid the formation of snow pockets and, therefore, reduce the likelihood of leaks to a minimum..
However, the disadvantage in this case is the need to create a roof truss system without a supporting ridge girder, or to break the beam at the chimney passage with the installation of additional supports at the break points.
Another nuance is that for pipes of circular cross-section, manufacturers, as a rule, do not produce components with which it would be possible to pass the pipe through the roof..
Therefore, we can only talk here about chimneys of rectangular and square cross-section.
Another successful method of positioning the pipe relative to the roof is its placement near the ridge, on the slope, which will also avoid the formation of a snow bag and, from a technical point of view, it will be relatively easy to implement..

The height of the pipe above the roof, depending on its location
Where it is not recommended to install a chimney pipe
The most unfortunate place where the passage of the pipe through the roof can be arranged is the valleys - the junction of two slopes forming an internal corner.
It is very difficult to achieve a high-quality adhesion of the coating to the pipe here, while an additional load on the chimney (including from the point of view of its sealing) will be created by the water flow collected from the adjacent slopes, and in winter an extensive snow pocket will form above it.
Advice!
In addition, the passage through the roof of the pipe will require complication of the rafter structure at the installation site.
Completion of installation
At the end of the assembly, the protective film must be removed from the pipe. The chimney length is considered ideal, starting from the grate and ending with the head within 5-6 m. Special attention should be paid to these values. Then all gaps and existing seams are sealed.
The operation is performed using a heat-resistant polymer composition that can withstand temperatures of more than 1000 degrees. Sealant treatment is as follows:
- Inner pipes - the outer wall of the top is covered.
- External products - one external surface is processed.
The junction of double-walled products with other parts is covered with a polymer composition only on the outside of the circle.
The joints of the modules and the single-wall pipe are sealed according to the last option.
After completion of all work, it is imperative to check the hazardous areas for their ability to withstand high temperatures.
To facilitate the maintenance of the chimney, the installation of a special revision is provided. This part has a removable part or is equipped with an opening with an opening door.
Typical errors
When installing a vertical channel in a wooden house, fire safety requirements must be strictly observed. In this case, it is important to correctly make and process the passage of the sandwich pipe through the ceilings made of wood. These places must be well protected. Usually sheet steel is used for this, in which holes are made. The free space is closed with non-flammable thermal insulation materials.
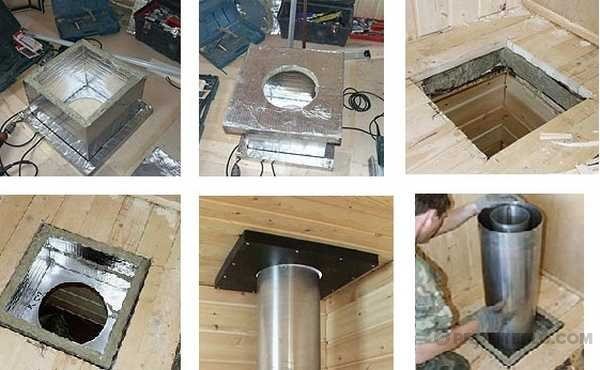
To facilitate the work, a special ceiling-throughput unit (PPU) is often installed. In its appearance, it is very similar to a box. Its installation is necessary to perform certain actions:
- If the house shrinks or deforms, the chimney must retain its original position.
- PPU protects wooden floors and prevents them from burning.
The best option for laying a vertical channel is to install a special sandwich system. Usually, problems arise only if low quality thermal insulation was used during installation, for example, general construction insulation instead of a special non-combustible material.
Basalt wool is considered one of the options for such protection.
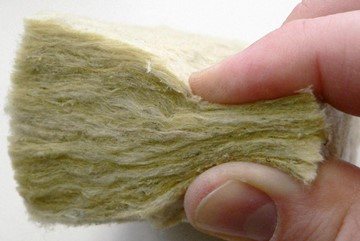

It is sometimes misused. This material is known to be capable of storing heat.If you just wrap a chimney with it, then after 4 hours of operation, the insulation will begin to give the accumulated heat back, thereby provoking the chimney overheating. To prevent this from happening, it is required to install a special steel sleeve that would cover the cutting insulation layer. Superisole can be used as the latter.
This steel element should be in the form of a cylinder. It is important that the height of the part is equal to the thickness of the groove. The sleeve will help to avoid temperature rise and will help to remove heat from the thermal insulation.
Around the steel part, it is necessary to organize a micro-ventilation system, which is an air gap with a thickness of 3 mm. The air moving around the liner will cool it, thereby lowering the temperature.
Installing a steel product allows you to use the heater for a long time, eliminating the risk of overheating.
What is a sandwich pipe
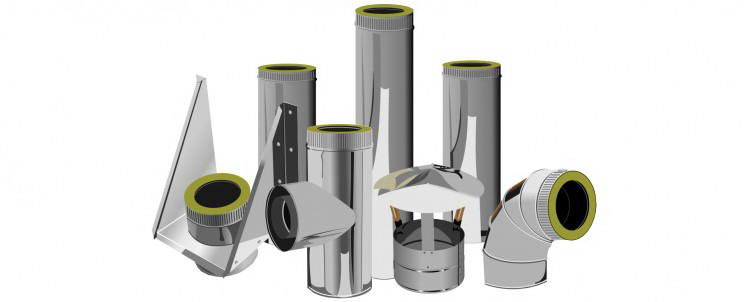
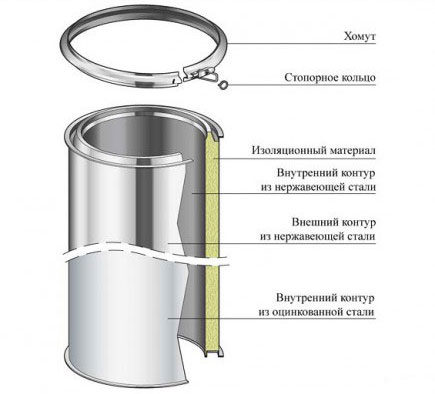
Sandwich - this type of pipe received this name for its layering by analogy with the named product. The inner and outer layers of such pipes are represented by metal cylinders, and the middle layer is a layer of thermal insulation.

Metal for the chimney began to be used for a long time. A simple example is the pipe of an ordinary potbelly stove. However, soon after commissioning, it became clear that metal pipes have a number of disadvantages. The problem was that metals, having good thermal conductivity, quickly heat up and give off heat to the environment, and there is always a danger of ignition.
Related article: The better to insulate the roof of a wooden house
The solution turned out to be simple - the metal pipe was wrapped in a layer of thermal protective material. However, such material does not tolerate environmental conditions well and is not very attractive from an aesthetic point of view.
Sandwich pipes are the next solution in the evolution of metal chimneys. Another metal pipe is placed on top of the thermal insulation layer, which protects the inner two layers from external influences and does not spoil the appearance of the building.
It is important! Sandwich pipes can be purchased ready-made, but you can do it yourself by choosing the materials of the required parameters. It should be remembered that the inner pipe should be more expensive and of better quality than the outer one, but smaller in diameter, and the thicker the thermal insulation layer, the higher the combustion temperature of the fuel in the heater.
The inner cylinder is made of stainless steel. This material is less corroded by combustion products. The steel must be of high quality and high-tech. They give preference to those options, the seams of which are welded using the TIG method - the most reliable and wear-resistant, but also the most expensive.
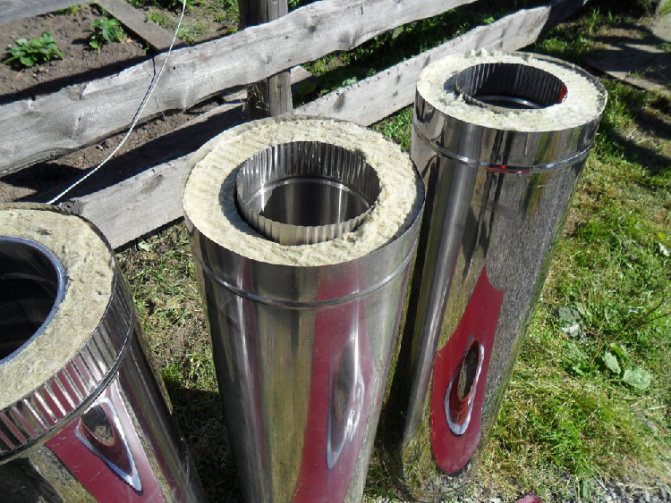

The middle layer provides thermal insulation and protects the surrounding surfaces from heat. For these purposes, mineral wool is used, the density of which is not less than 120 kg / m3. The thickness of this layer depends on the temperature inside the chimney. This parameter should be selected individually.
The outer cylinder is also made of steel. It is worth giving preference to stainless material, but to save money, you can choose galvanized steel. The durability of the chimney will depend on its quality to a lesser extent than on the quality of the inner cylinder. In addition, there are sandwich pipes with decorative outer cylinders on sale.
Features of this design
A sandwich is a good option for a chimney with insulation. Warming provides you with the following advantages:
- the possibility of the functionality of the chimney while being in the zone of low temperature conditions;
- endows the pipe with the necessary fireproof properties (inside the building).
Standard versions of such chimneys have an external galvanized coating.There are also options made of stainless steel, as well as painted in any color that suits you.
Existing versions of sandwiches made of stainless steel are covered with a special protective film from the outside. The main thing - do not forget to remove it before using the chimney for its intended purpose. There are also special adapters on sale that you will need when connecting the boiler and pipe. Be careful when choosing elements for a sandwich chimney.
Sandwich pipe device diagram.
The necessary tools for work are:
- jigsaw;
- pencil or marker;
- roulette;
- level;
- Bulgarian;
- screwdriver.
Installation of a sandwich chimney
The chimney can be connected both directly to the stove and to the heat exchanger (tank) through which the chimney passage is made.
The first thing to do is to install a single-wall stainless steel pipe of the required length. Installing a single-wall pipe will help dissipate a large amount of heat at the first stage.
When installing an insulated version of the chimney (sandwich), a high degree of heating will contribute to overheating of the outer circuit of the chimney.
Layout of the passage of a sandwich pipe through the roof.
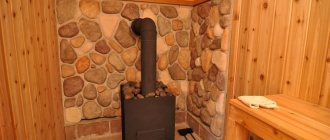
With the first option with a single-wall chimney, you will significantly reduce the heat loads on the chimney and at the same time ensure rapid heating of the steam room. At the next stage, the insert-gate valve (gate) is installed in the absence of it in the oven for the bath. With a low bath ceiling, the gate is fixed directly to the stove (tank, heat exchanger), while single-wall pipes are not used.
Now it is necessary to carry out the device of the lower nozzle. It will carry out the transition between two types of pipes - single-walled and insulated (sandwich). The time has come to install the insulated bath pipe. It should be of the length you need and be placed up to the highest point of the chimney. It would be impractical to install a single-wall pipe in the upper part of the chimney after the sandwich. With this option, the flue gases will cool down rather quickly, which contributes to the deterioration of draft and the formation of condensate.
To make a passage through the floors of the bath (combustible), you can use the so-called telescope. This design provides for the presence of adjustment for the desired thickness of the existing overlap.
The installation technology is as follows:
- A hole is cut in the ceiling of wood, 15 cm larger than the diameter (outer) of the sandwich pipe. This hole will accommodate a telescopic sleeve.
- The space between the overlap of the bath (house) and the installed sleeve is filled with heat-resistant insulation, as an option, expanded clay can be used.
- Square sheets attached at the bottom and top will mask the gap (where the passage is through the roof) and help maintain an attractive appearance.
Another nuance: in order to efficiently carry out a sealed passage through the roof of the bath, it is necessary to use a special silicone penetration made on an aluminum base, which easily takes the shape of the roof.
In the upper part of the chimney, there is an insulated nozzle that covers the insulating material from the sandwich. This means that protection from moisture and destruction is provided to you. An umbrella is installed in this nozzle, designed to protect the chimney from various types of precipitation. All joints of elements and thermal insulation (nozzles, pipes, etc.) are reinforced with tightening clamps that prevent separation.
Types of location of sandwich chimneys.
Sandwich chimney installation
Unlike other chimneys, this does not require a concrete base. However, there are several nuances here that must be taken into account even at the stage of preparation for installation. First of all, draw a diagram showing all the dimensions of the structure.
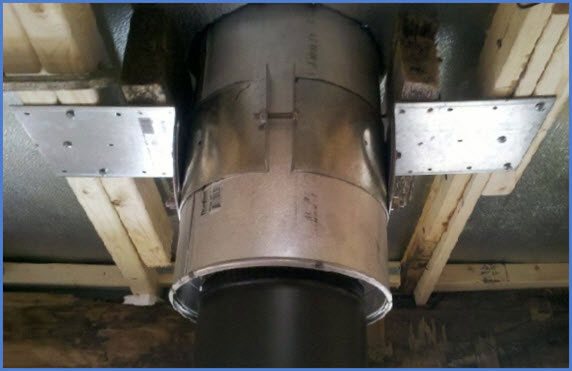

The assembly starts from the outlet of the boiler or stove.The first element of the chimney is a pipe without insulation, which is inserted into the socket and the joint is insulated with a plug. Then, sequentially, all other elements are collected. The joints are fixed with special clamps.
Video: The passage of the pipe through the roof of the corrugated board
In places where the structure passes through the ceiling, it is recommended to make additional thermal insulation. Even in spite of the excellent thermal insulation properties of "sandwiches", the possibility of heating and ignition of the flooring materials is not excluded.
The passage of the pipe through the wooden roof. Typical errors and execution technology
When installing a chimney in a wooden house, in order to ensure fire safety requirements, particular importance is attached to how the pipe passes through wooden floors. Protection of these places is mandatory and is carried out using sheet steel equipped with holes and using non-combustible heat-insulating materials.
Often for these purposes, a special ceiling pass-through unit (PPU) is used. Its appearance resembles a box or sleeve. It is mounted to perform the following functions:
- to prevent deformation of the chimney in case of shrinkage or deformation of the structure;
- to protect wood floors from fire.
How to equip roof passages
The installation of a chimney is necessary so that a draft is formed in the furnace, and the combustion products come out of it. When it comes to arranging a bath, then most often they use metal or brick pipes.
Even during the design of the building, it is necessary to decide how the chimney will be removed from the roof. Otherwise, difficulties may arise already during the period of direct construction. The passageway between the roof and the chimney must be fire resistant, and also provide reliable protection of the room from external environmental conditions. That is, you should pay special attention to high-quality waterproofing.
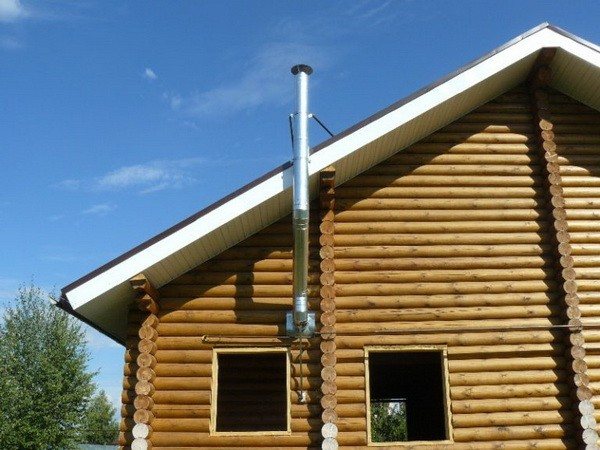

There are several ways to install a chimney:
- Exiting the pipe through the load-bearing wall at an angle,
- Through a load-bearing interior partition.
The best option is to have the pipe passage closest to the highest point of the roof. This location will be able to protect the structure from leaks to the maximum. In any case, the pipe head must be raised above the coating by at least 50 cm.
The node of the passage will be equipped for each separate type of pipe in an individual way. In addition, the material from which the roof is made is also important. Modern construction markets present a large number of materials that are suitable for waterproofing a chimney under one or another type of roof.
The most important point in arranging the passage of the pipe through the roof will be the choice of the correct slope. The pipe should be positioned so that there is a distance of about 7 cm between it, the roof and the rafters. Subsequently, these holes must be filled with non-combustible insulation.
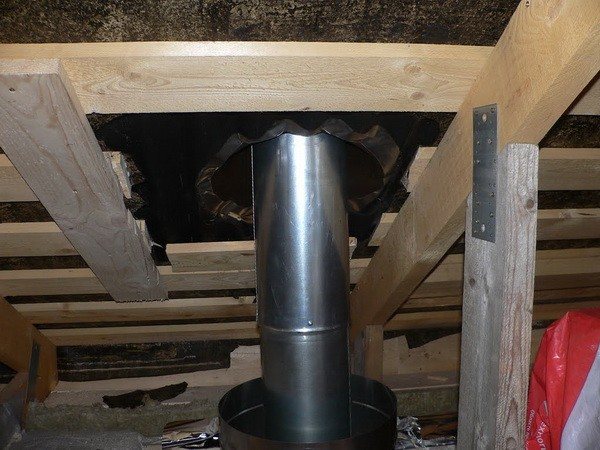

Pipe parameters: height and section
Installation of the chimney through the roof can be carried out using various technologies using ready-made structures or special elements. The choice of technology is primarily dictated by:
- type of roof (flat or pitched);
- features of the roofing;
- chimney shape;
- the presence and type of chimney lining.
Structural elements and materials such as a duct, a chimney cover, insulation, sealant, abutment strips, etc. must correspond to the type of chimney to be installed.
Correctly assembled roof penetration assembly must be fireproof and airtight. Moisture trapped inside the roofing cake provokes rotting of wooden elements of load-bearing structures, the development of harmful fungal mold, and reduces the thermal insulation properties of cotton wool insulation.
When purchasing components and materials for installing a chimney on the roof, you must familiarize yourself with the quality certificates for each type of purchased product. It is recommended to go to specialized stores.
One of the conditions for the high-quality organization of the exit of the pipe through the roof is the correct determination of the location of the chimney outlet. This factor affects the operation of the entire heating system, so mistakes are unacceptable here.
Therefore, the installation of a chimney from a soft roof must be carried out in strict accordance with building and fire safety standards:
- The distance from the highest point of the roof to the chimney should be 1-1.5 meters.
- The distance from the ridge to the top of the pipe must be at least 0.35 meters and not more than 1.5 meters.
- With an increase in the height of the pipe, the traction force in the furnace or gas boiler increases.
- The further the chimney is from the highest point of the roof, the higher the chimney should be.
- The height of the chimney and its diameter should be determined in accordance with the recommendations of the manufacturer of the heating device or according to special calculations.
- When solving the problem of how to install a chimney pipe through the roof, it should be borne in mind that the total length of the horizontal sections should not exceed one meter.
- The pipe outlet must be located between the elements of the rafter frame, in this case the integrity and strength of the system will not be compromised.
The main difficulty in organizing the exit of the chimney through the roof is the high risk of ignition of fire-hazardous materials of the rafter system due to an increase in the temperature of the walls.
The key point in the installation of the chimney is to ensure the safety of operation. Of paramount importance in this matter is such a physical parameter as the height of the pipe.

The calculation of the height for each roof is carried out taking into account the slope of the slope, the thickness of the roofing cake, the priority wind direction and other individual factors.
A high chimney is a good draft, but in too high smoke, cooling down, increases the mass of combustion products, and the draft, on the contrary, will decrease.
- the minimum chimney height on flat roofs is half a meter - this is enough so that the hot gases discharged do not harm the roofing;
- if the pipe is at a distance of no more than 1.5 m from the ridge of the pitched roof, then its upper part (excluding the head) should be 50 cm higher;
- when placed at a distance of 1.5 to 3 m from the ridge, the chimney must be made not lower than the level of the ridge element;
- a chimney located at a distance of more than 3 meters from the ridge may be slightly lower than its level: if you connect the upper points of the ridge and the chimney, the angle between them should be no more than 10 degrees.
An important feature must be taken into account: if the heated room has a common wall with a higher building, that is, attached to it, then all calculations are made taking into account this fact. In other words, the chimney must rise to the specified height above the taller roof of the adjoining house.
The pipe must be of the same diameter throughout, the cross-sectional area depends on the heat output of the heater or stove, which is indicated in the instructions.
The walls should be as smooth as possible so that soot does not accumulate on them.
Several basic types of chimneys from various materials are used, each type has distinctive features - the presence or absence of thermal insulation, a tendency to form condensation, good draft and other advantages and disadvantages.
What you need to know about the removal of chimneys
The total size of the chimney should be at least 5 meters, and the part of the chimney above the flat roof should be about half a meter. And the distance from it to the rafters should be about 250 mm.
- Experts recommend moving the chimney to either side of the ridge. And the pipe must rise above it by at least 50 cm, if the distance between them is up to one and a half meters.
- When it is at a distance of up to three meters from the ridge, then you can make it flush with the ridge.
This transfer will be easy when using sandwich structures. If this is not done, then the constant accumulation of water at the junction will soon lead to a leak.
Pipe withdrawal rules
Highlights
The outlet of the chimney to the roof should be provided much earlier than the construction of the roof itself. This applies to all types of pipes: for example, the installation of a sewer waste pipe, which prevents the formation of unpleasant odors, must also be designed even before the construction of the roof.

The device of a stove or fireplace is taken into account even before laying the foundation of the house, since the place for their arrangement must be especially durable. Furnace equipment is always massive enough and cannot be installed anywhere in the building.
- When erecting a roof, you must remember: there should be no accumulation of beams and rafters above the stove, no passage of communication systems.
- Any chimney must be efficient and properly fulfill its intended purpose - removing smoke from the stove. Long and straight pipes have the best traction. At the same time, they are less productive, since part of the heat escapes with the smoke.
- The draft is influenced by the wind. The higher the chimney is placed on the roof, the better it is blown by the wind and, accordingly, the higher its draft. Thus, it is best to locate the chimney closer to the ridge of the roof.
- To obtain good draft, it is enough to bring the chimney 40-50 cm above the roof ridge.
- It is possible to increase the thrust with the help of a head, which divides the air flow into two: up and down. In this way, you can increase the thrust by a quarter.
- It is important to insulate the chimney. This will prevent the formation of condensation in it from temperature drops and an unpleasant odor. The insulated pipe will have the best effect on the efficiency of the furnace, since the generated heat will not be spent on heating it. For this, a galvanized casing and basalt wool are used.

Chimney height
We will separately consider the issue of the height of the chimney. This parameter will depend on:
- Furnace draft;
- Fast heating of the oven;
- The amount of soot.

This parameter is strictly regulated by GOST and SNiP. The norms say:
- The chimney outlet is possible at a distance of up to one and a half meters from the roof ridge;
- The top of the structure must rise above the roof by at least 50 cm;
- If the pipe is at a distance of one and a half to three meters from the ridge of the roof, then its elevation should be flush with the ridge;
- If the installation is carried out more than 3 meters from the ridge, then the chimney height is 10 ° lower than the ridge.
Compliance with these parameters is a guarantee of safe and high-quality use of furnace equipment.
Types of arrangement of the passage
In order for the tightness of the passage assembly to be the best, high-quality execution of roof junctions is necessary. When arranging the passage, no flammable materials should be used.
How to properly organize the passage
The vapor barrier layer must be cut with an envelope and laid over the penetration. Its edges are fixed with a construction stapler to the rafter structure. It is necessary to create a crate near the passage and fill it with waterproofing material. Further, by analogy, a water-repellent carpet is made by cutting it with an envelope. Leaving about 10 cm on it, to insert the material onto the pipe wall.
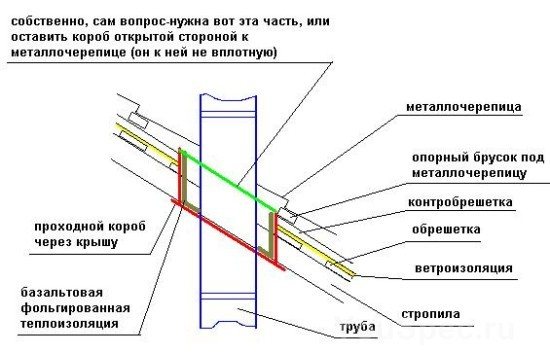

It is imperative to leave a small gap around the perimeter of the chimney. This is done to ensure proper shrinkage of the structure. In addition to the described method, the following can also be applied:
- self-adhesive tapes with strips,
- special self-adhesive strips,
- special parts that are produced for a specific type of roof.
In the case when we are talking about a non-newly built building, and the arrangement of the chimney is not taken into account in the original design, then when the pipe is removed through the roofing, its integrity is always violated.In this case, it will be necessary to determine the territory where the chimney will pass through the roof.
A so-called separate box is created, in which the passage node will be located, separating it with transverse beams. This is necessary in order not to violate the integral insulation layer of the entire floor. This will reduce the thermal protection of the entire room.
The distance that forms between the pipe and the truss structure is filled with basalt wool, which tolerates high temperatures well, and does not triple its properties under the influence of humidity.
