The modern market is replete with a huge assortment of different pipes for sewer systems. The vast majority of which are made of plastic, and this is not surprising, because plastic is a lightweight, strong and durable material. Such pipes are able to withstand the impact on them of the external environment, which is one of the key details when working with risers. In this article, we'll talk about how to install such sewer pipes in a house.
The advantage of plastic sewer pipes
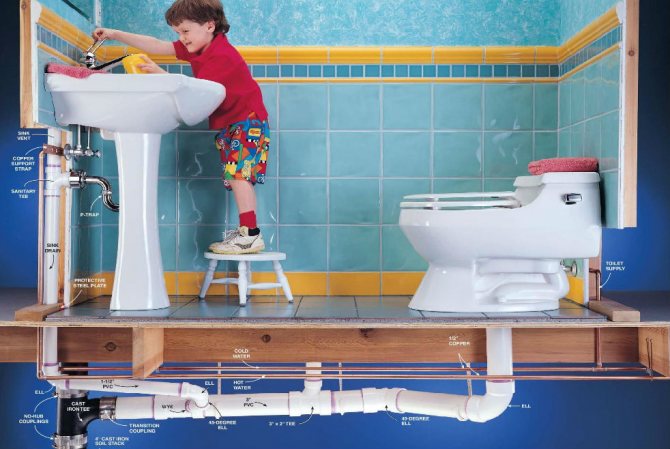

The advantage of plastic sewer pipes will be their small specific gravity, which allows you to calmly work with pipes with your own hands, without attracting additional special equipment. Plastic pipes have a smooth inner surface, which practically eliminates the possibility of clogging.
And one more advantage of this material is its low price. Which makes them out of competition with pipes made from other materials.
Contrary to all of the above advantages, great attention should be paid to the installation of sewer pipes in the house, since incorrect installation of them in the sewer network (CS) can reduce all the advantages of such pipes to zero. So, if a pipe or bend is incorrectly installed, blockages may appear in some places, which paralyze the operation of the entire sewer network. This often occurs in private houses, less often in urban apartment buildings. Since pipes of a larger diameter are installed in the latter than in a private house, this allows minor errors to be allowed.
Methods for tapping into a sewer pipe
There are situations in life when there is a need to connect an additional branch to the existing sewage system. Consider how to crash into a sewer pipe if the overall system is assembled from plastic or metal pipes.
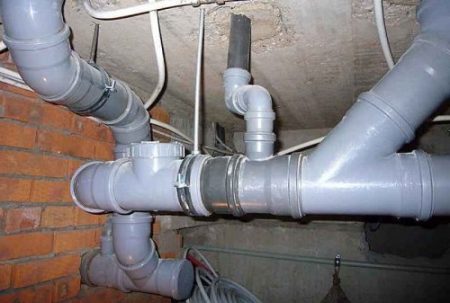

Installing a tee on metal pipes
To connect an additional sewer branch to a common pipe, it may be necessary to install a tee. If the sewage system is assembled from metal pipes, the work is done as follows:
- A piece of pipe is cut that matches the length of the tee.
- The tee is installed in the place of the cut in the form of a sleeve.
- The seams are being welded.
Insert into a plastic pipe
If the overall system is assembled from plastic, the pipe is cut into the pipe without welding:
- A piece of pipe is selected, on which there is a branch pipe of the required size.
- A workpiece is cut from this segment, in which the branch pipe itself and a small part of the pipe are left, which can cover the place of the incision in the main pipe.
- A hole is drilled in the main pipe using a crown nozzle on a drill, which in diameter exactly matches the size of the branch pipe on the workpiece.
- The inner surface of the workpiece and the surface around the hole on the main pipe are lubricated with a silicone-based sealant.
- A workpiece with a pipe is placed on the pipe and clamped with clamps, the insert into the plastic sewer pipe is finished.
Advice! The clamp must not be overtightened, as excessive force may cause the pipe to burst. A sealant protruding from the edges of the part will indicate that the tightening is sufficient.
Sewerage system
Sewer systems are very often clogged. Often this is not due to violations during the installation of the sewer system, but due to the fact that it is often used for other purposes, throwing various garbage into it.
But it is also impossible to write off errors in the installation of sewer pipes in the house. Since some "masters" use pipes with a rough surface for the sewage system, which clog up an order of magnitude more often than smoothly coated ones. Another mistake is an incorrectly drawn up plan of the COP, and the assembly is correct, the result will be a high-quality assembled non-working SC, which will clog up in places of large bending and turning angles.
All this must be foreseen before starting the installation of the sewer system with your own hands.
Features of the installation of sewer pipes
During operation, such pipes are faced with a host of detrimental factors. Even at the production stage, firms try to isolate their products from them as much as possible, but this is not always the case. Therefore, during installation, several features must be taken into account:
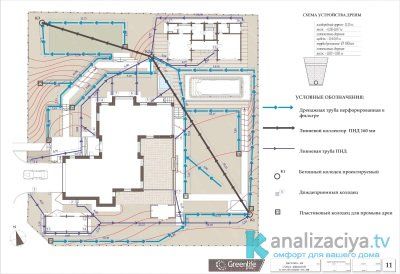

- Even before starting work, it is necessary to make a diagram of the system, which will take into account the features of each of its sections. For example, it should be spelled out in which place the pressure pipes are used, and at which - the corrugated ones. This will help to avoid not only errors during installation and selection of each individual element, but will also play an important role in the operation process. Especially when you are faced with difficulties such as blockage or freezing. The diagram will allow you to determine in which part of the sewage system the system failed.
- Damage to the inner layer and the appearance of irregularities within the system should be avoided as much as possible. All of them lead to the fact that small debris and just fat and soap deposits can cling to these areas and form a blockage. Manufacturers avoid this problem as much as possible. Often in pipes, the inner layer is made of a smoother material than the top. All this is necessary for comfortable operation.
- Typically, pipes, especially those with a relatively large diameter, are sold in sections of several meters in length. The installation of sewer pipes for the most part consists precisely of connecting these elements to each other. Such areas are the most vulnerable, in them most often there is such a problem as a leak. Several types of materials can be used as insulation, for example, silicone, fabric or tape sealant, cement mixture, linen cloth.
- The sewerage system is divided into external and internal. One of them runs inside the house, the other outside. The main part of the installation in both parts of the system is similar, even identical, but in each of the cases it is necessary to make several additional manipulations that make it possible to provide more comfortable operating conditions.
- In areas with a harsh climate, thermal insulation of all elements is very important. For this, special materials are used, as well as improvised means.
All these are features of the installation of sewer pipes in general. Otherwise, the installation process depends on the material and location of each individual element.
Pipe preparation
Before starting the installation of sewer pipes in the house, it is necessary to adjust the work to size. This is done by slicing them up. This process is performed in several ways:
- Cutting machine - as a result, the edges of the cuts are clean and smooth. It is convenient to use this machine for cutting a large number of pipes.
- A special saw - the result is also quite pleasant, not inferior in cut quality to a cutting machine. This method is very convenient because the saw does not take up much space.
- A hacksaw for metal is the most budgetary method. If you do not want to spend extra money on buying a special saw or, even worse, a cutting machine, then an ordinary metal saw, which almost every craftsman has, will suit you.
How not cool, but to cut off the pipe in these ways, you need free space.What if there is practically none? In confined spaces where the saw cannot crawl, use a steel cable attached to the handles. In this case, the pipe is not cut off, but rubbed at a right angle. The quality of such a cut is not comparable to a similar cut with a saw, but you will have to try, otherwise the joining will not be of high quality.
Important! Burrs usually remain when cutting. They must be removed, since during subsequent installation they will interfere with high-quality gluing. They will also interfere with drains advancing in the pipe.
They are easily removed with a regular kitchen knife, by scraping off the cut points. This work should be done efficiently, because the entire functionality of your design will depend on how you cleaned the gluing points.
Installation rules ↑
Normal pipeline slope
Most often, an autonomous sewage system is equipped with a gravity type, i.e. one where all waste household liquids flowed by gravity to a storage tank or sewage treatment system.
Important! In order for liquid waste not to overfill the drain pit or septic tank chambers, as well as not to stagnate in the pipeline, it is necessary to lay the sewer pipes at a certain slope.
The slope of the sewer pipe is made from the plumbing fixture to the internal pipeline, then, to the external sewer network and further towards the septic tank or drain pit.
The slopes used from 0.8 to 3 cm ensure the normal flow rate of wastewater to the storage or treatment sewer tank.
For the optimal speed for sewerage for a private house or summer cottage, they always take from 0.7 to 1 m / s (SNiP 2.04.01-85).
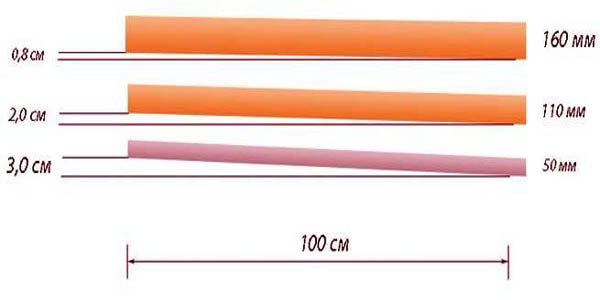

Photo: slope of the sewer pipe
There is a certain percentage of the width of the pipes, taken as the norm to ensure sufficient drainage - from 2 to 15 units.
This means that the difference between the diameter of the end of the pipe at the point where the plumbing equipment is connected to the sewer system and between the width of the pipe that goes into the drain pit or septic tank should be from two to fifteen centimeters.
Pipe size also plays a large role in the normal flow of fluids.
The most optimal pipe diameters for different sections of the autonomous sewage system are:
- washbasin and bidet are connected to pipes with a diameter of 32 to 40 mm;
- sink and bathtub are connected to pipes with a diameter of 50 mm;
- toilet bowl, drain pipe for drainage are mounted to pipes with a diameter of 100 mm;
- the riser and the places where several plumbing fixtures are connected at once are installed on pipes with diameters from 70 to 85 mm.
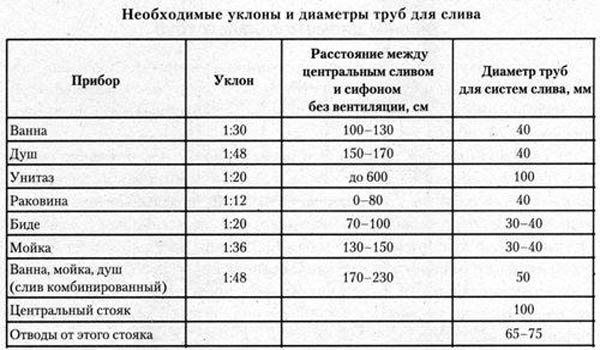

Photo: slopes and diameters of drain pipes
Insulation of the sewer pipeline
The rules for installing sewer pipes also include their insulation. This is especially true of such pipeline laying as a sewerage device in a private house, which is located in an area where soil freezes at a depth of less than 50 cm.
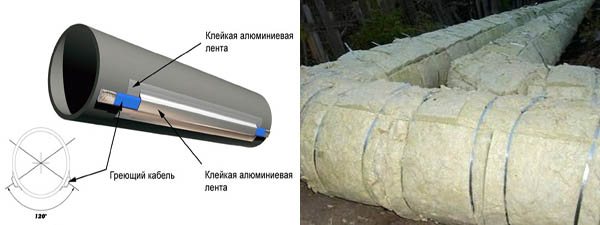

Photo: insulation with a heating cable insulation of a sewer pipeline with fiberglass
Pipes are insulated with glass wool or fiberglass by wrapping, covering with polyethylene and fixing with wires.
Autonomous sewage ventilation system
The presence of ventilation of the sewer pipeline allows the entire system to work unhindered and not to accumulate all kinds of gases that can form from various compounds contained in household waste fluids.
Moreover, these compounds can be both chemical and organic.
Chemical inclusions are those that enter the sewer system of the pipeline with detergents and cleaning agents, and organic ones - with feces, bacteria (if you use aerobic bacteria to cleanse and decompose fecal masses), products of decay, decay and other elements that one way or another can form gases.
Gaseous substances tend not only to ignite or create pressure in pipes, but also to evaporate, causing harm to human health and damage to the natural environment.
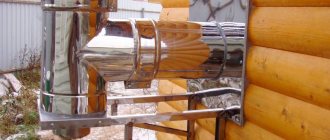
If the house is several floors and there are several sewer risers, then ventilation should be located in each riser. Ventilation outlet to the outside, in such cases.
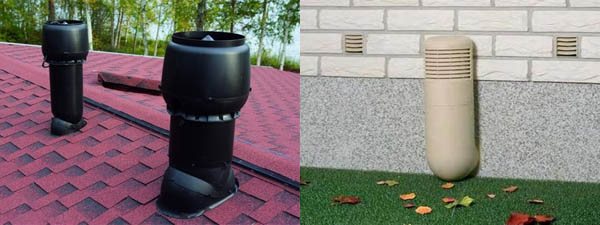

Photo: sewerage outlet through the roof sewerage outlet through the wall
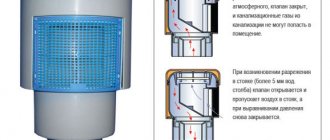
Usually done through walls or roofs. For sewer pipes of several risers, aeration valves can be used as additional ventilation.
And as for ventilation wells in sections of the external pipeline, they must be installed closer to septic tanks or drain pits, as well as near the drain pit itself.
This is to ensure that gases do not accumulate inside the pit and the sewer inlet that belongs to the sewer network.
For more information on Grundfos fecal pumps with a chopper, see the article: fecal pumps with a chopper. Comparative characteristics of septic tanks Topas and Poplar, see the page.
Find out how to correctly calculate the volume of a septic tank here.
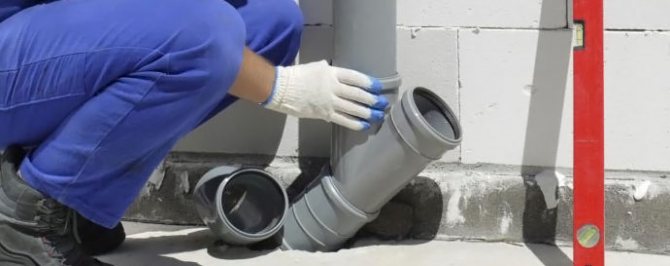
Installation of sewer pipes
- The first thing to do is to find out the level of the finished floor. It is important to know exactly, and not approximately: how many centimeters will be filled to the level "zero". This is necessary in order to accurately bring the wiring under the sinks: shower, sink, toilet, etc.
- The next step is to put marks where and at what distance each structural element will be installed. You can use chalk, construction pencil, or marker.
- Then we mark the pipes and fittings, while measuring the correct angles of inclination of the structural elements.
- To ensure the tightness of the sewage system, all pipes, bends and joints must be carefully measured and fitted. To achieve this, you must initially measure everything, try to connect, and then glue it together.
- Be sure to check the joining of the parts, since the pipe, with the correct connection, should go into the socket more than half without effort, and then with a little effort. If so, then the fit is correct.
- Be sure to sand the pipe joints with zero-grade sandpaper until it becomes rough.
- Installation of sewer pipes in the house involves the use of special glue for the connection. There is a large selection of such glue in stores, study the instructions supplied with the pipes and find out which glue the manufacturer recommends.
- Methylene chloride is a substance that degreases and softens pipes at the joints when glued. It also needs to be used.
- The glue is applied with a swab, which should come with the glue, but it will be more convenient to use a regular brush. The joint on the pipe is covered with a rather large layer of glue, and the joint in the socket is covered with a small one.
- After applying glue to the joints of the connecting surfaces, the pipe is inserted into the socket so that the marks applied to the connecting parts are a couple of centimeters apart. For a while, the structure should be fixed in this position for 10-15 seconds.
- Further, the parts are turned so that the marks coincide. When glued correctly, the extra layer of glue should come out.
- After gluing, the parts should be held for about 1 minute. Then the joint is coated with glue for reliability.
On average, one gluing operation takes about 2 minutes so that installing sewer pipes in a house with your own hands does not take much time. But you shouldn't hurry either.
By following all of the above rules in the exact sequence, you can easily assemble the sewer system yourself, without resorting to the help of expensive specialists. Good luck in your endeavors!
Laying PVC pipes
When installing PVC pipes, they must be positioned so that the smooth end is directed towards the movement of the drains. In a trench, if the ground is wet or dirty, the pipe should be placed on a waterproof cover such as tarp. Pipes and fittings should always be clean and dry as water or dirt trapped in the joint can cause leaks.
Safety precautions must be observed when digging a trench. Deep trenches should be fenced off. The trench should be kept as dry as possible and the walls should be solid and strong.
Please note that a PVC pipe laid in a trench may float as the water level rises. This problem can be solved if the trench is filled up using a special technology. Rule of thumb: The required backfill height should be at least 1.5 times the pipe diameter. For example, a pipe with a diameter of 110 mm should be backfilled with at least 165 mm of soil to prevent it from floating up during flooding.
Photos of sewerage installation works:
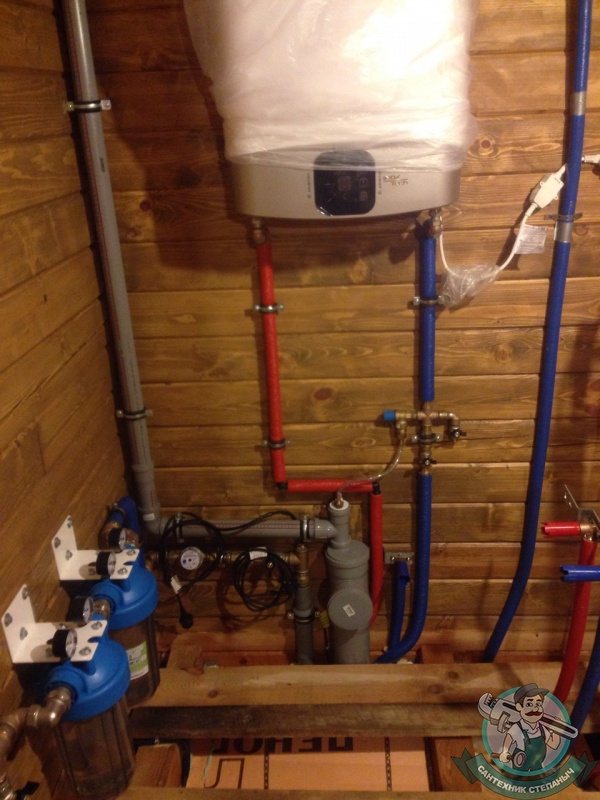

Other photos of sewerage installation >>
Direct installation of sewerage systems in public buildings is carried out in several steps. Initially, you need to select the class of consumables used. They differ in a number of parameters:
- life time;
- value for money;
- ease of repair;
- harmony in the interior.
The quality of the work done will depend on the choice made. It is preferable to provide such a selection of the constituent parts to the masters who will perform the planned amount of work. The described method will insure clients against unplanned expenses.
Connection of plastic and cast iron pipes
Installation of only one type of material takes place when a completely new system is installed. But sometimes it is necessary to replace only a section of sewer pipes, for example, old cast-iron pipes with more modern plastic ones.
Experts recommend always changing the system completely, but this is not always possible. For example, if you live in an apartment and the overall system is made of cast iron. Then you need to study the instructions on how to connect plastic and cast iron pipes. Several different techniques can be used here.
Connection of plastic and cast iron pipes with a seal
This method is the simplest of all of the above, but at the same time it is considered one of the most durable. For it, it is necessary to purchase plastic pipes, which will be slightly smaller in diameter than cast iron, and a sealing ring with a thickness equal to the difference in diameter.
O-rings are made from soft rubber. They are able to completely close all possible voids and save you from leaking.
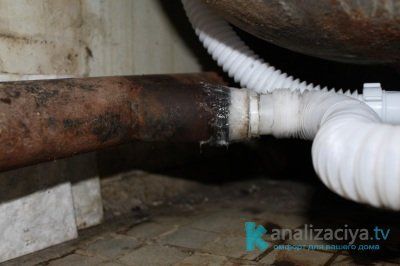

Installation takes place in just a few steps. To connect the plastic and cast iron pipes, it is enough to put the O-ring on the first one and insert the second inside. Already at this point, the installation can be completed, but some resort to additional waterproofing measures using silicone or tape.
This can also include the connection of a plastic and cast iron pipe using a cement mixture, as well as when installing pipes, which was described above.
Connection of plastic and cast iron pipes with a sealant
Sometimes it is enough to fix the element with silicone sealant. For this, pipes are selected, the diameter of which is approximately equal.
The plastic pipe is sanded and covered with a sealant. After a few minutes, it is inserted inside the cast iron and adheres to 2-3 minutes.
The disadvantage of such an attachment is that before checking the operation of the system, you must wait about a few hours for the product to dry completely.
Connection of plastic and cast iron pipes using fittings
Fittings are additional elements of the sewage system that are used in the event that the usual installation of pipes is difficult. With the help of them, you can create a bend, branching, connect pipes of different diameters and different materials.
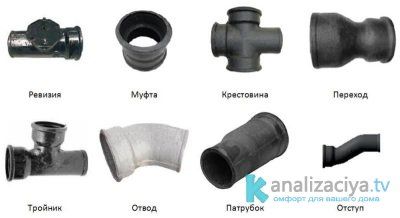

In our case, such a mount is especially useful if the cast-iron pipe is threaded. Here you need to choose a fitting that also has this element. If any other connection methods are used, the threads may cause leakage.
To connect the fitting and the cast iron pipe, it is necessary to wrap the thread of the first element with a tape seal, and then simply screw it into the cast iron element.
Further installation is carried out according to the same principle as the connection of plastic pipes to each other. The edge of the new plastic pipe is prepared and coated with sealant, and then inserted into the fitting.
Assembling an external system
For the installation of an external drainage system, orange pipes are used. Coloring in this case indicates the use of this product exclusively outside the premises.
To arrange a place for laying a drain, a cushion of sand and gravel is created. The height of such a blanket is no more than 200 mm. The creation of such a gasket is carried out under the pipes and on top of them. First, sand is poured, then crushed stone. The stacking order should not be disturbed.
External sewerage wiring in a private house
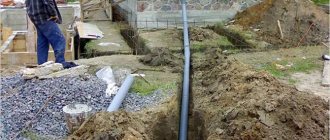
Sewerage is laid in specially prepared trenches. If the trench height is insufficient, the system may freeze. Therefore, you need to know to what depth to bury the plastic sewer pipe. To determine this parameter, there are mandatory requirements:
- The path of the system must lie below the level of soil freezing. This figure will vary depending on the region. In the European part, this figure is 80 cm.
- At the entrance to a septic tank or sewage pit, the level drops to a mark of 100 cm.
- The depth of the trench at the outlet under the foundation is 50 cm, provided that the wastewater temperature is above 15 degrees.
If it is not possible to lay the system at a given depth, the pipes are insulated using insulators or a heating cable. They will help keep the heat inside the system and will not protect the liquid from freezing and creating ice plugs.
Trenching drainage from the house
Installation of sewer pipes is carried out as follows:
- The pipe is inserted into a special sleeve in the foundation.
- The processed edges with grease, with the installed rubber seal, are joined to each other until it stops. The entrance of the end of the socket is 40-45 mm. It is undesirable to use silicone grease in this case in order to prevent rubber delamination.
- The drainage system is laid on a flat surface without displacement. If direction changes are required, bends are used. A revision is installed on each fork.
- If the site is flat, but its length is more than 20 meters, the installation of a well will also be required.
- The sewerage system is led to a cesspool, septic tank or well. In this place, purification stations are connected to obtain technical water. It is convenient to use for hydroponic planting or site cleaning.
- Further, the entire system is checked for leaks and tightness of the joints.
- Thermal insulation is placed on the assembled structure and covered with sand.
Draining the drain through the foundation
To connect pipes, the socket method is used. It is unacceptable to assemble a structure from elements made of various materials. Since they have different thermal conductivity coefficients. Temperature drops can deform the system and create leaks on the line.
Sewerage installation in a private house
The fundamental difference between the sewage system and the water supply system is the thickness of the walls. In the drainage system, there is no large head, pressure surges, so the walls are chosen thinner. For owners of cottages or private houses, sewerage installation is divided into two parts: internal and external.
Indoor sewerage system
Internal design features
For internal work, products of small diameter 50, 100 and 110 mm are used. The widest is used when laying the drain from the toilet bowl to the collector. To connect other plumbing fixtures, a diameter of 50 mm is sufficient. When arranging the internal system, you must follow the rules:
- The width of the funnel should not be less than the main trunk line.
- The connection of branches adjoining horizontally is carried out only using beveled tees.
- Draw up a design scheme, work should be done where it will be more convenient. The location should take into account the availability for repair in the event of emergencies. Most often this is the basement.
- The main part of the structure is assembled in the warm part, the final part is taken out into the street.
- A mandatory requirement is the presence of a protective, exhaust valve.
- Turns must be equipped with revisions - this is access to the interior of the structure. It is necessary, since it is in these places that the most problem situations happen.
- Particular attention should be paid to the installation of the waste pipe.
- Sewerage is installed at an angle of 45 degrees.
- The exit to the street must be securely sealed.
Installation of a drain with an outlet under the toilet
After clarifying all the intricacies, you can start assembling the internal sewage system. To do this, you need to prepare the tools:
- hammer, chisel;
- silicone sealant;
- soldering iron for plastic pipes;
- level, marker.
Preparation begins with drawing a layout of the circuit from the entrance of the tee to the riser to all plumbing fixtures. The marks are set taking into account the required slope. Clamps for attaching sewer pipes to walls and ceilings are set according to the diameter.
A feature of the internal drainage system is the force of gravity. Waste water is discharged by gravity downward according to the laws of physics. Therefore, the assembly is carried out at a slope of 1-1.5 degrees. Another important point is the selection of the diameter of the prefabricated elements:
- For the riser and corrugation under the toilet, choose a diameter of 100 mm.
- For laying the line to the bathroom and sink - 50mm.
- Drainage from household appliances (washing machine) - 32 mm.
Plastic pipes of different diameters
After fitting all the structural elements, proceed directly to the installation. The algorithm of actions will be as follows:
- The inner surface is ground to a light roughness. This will provide better adhesion to the material.
- Degrease the edges of the parts with methylene chloride.
- The elements are glued together. To do this, use a tampon or brush, with which a small layer of glue is applied to the inner part of the socket, and a thick layer is applied to the outer connecting surface.
- Fitting is put on so that the marks correspond to the dimensions of the marking. Further, the details are expanded according to the marks. They must match with each other. They are held in this position for about 30 seconds.
- The joint is coated with sealant or glue.
Joining plastic elements with glue
The whole structure is assembled according to this scheme. If you have a soldering iron, then you can connect the plastic pipes with it, but the joints must be treated with a sealant. It will take no more than 3 hours to assemble the entire sewer system, subject to all the rules.This scheme is also valid for installing drainage in an apartment with your own hands.
