- What are attic windows for?
- Classification by design features
- Classic species and their new varieties
- Attic windows and their size
- Installation
- Bull's eye lukarna device
Windows built into the roof structure are quite common, especially since attics have long ceased to be used only as a warehouse for old things. And they provide additional lighting. The rationalism of our time does not interfere with a creative approach to the re-equipment of the attic for various useful premises: a bedroom, an office, and more.
In architecture, an attic window is defined as a window opening made in a roof with an attic. Thus, what is the name of the attic window, lucarna, dormer, dormer or even a birdhouse, in fact, does not matter. All of them are needed for airing and lighting the under-roof space. The only question is how convenient it is to open them, and in general they are closed or not.
History of the name
Many have heard this name, but not everyone knows why it is called that way. Referring to the dictionary of interpretation of V. Dahl, in the category "Hearing", the term stands, along with "for hearing", "vent".
The author designated the phrases "dormer window" and "hearing in the roof", with the note "although there is nothing to listen to." Also, Dahl gives the phrase "hears the wind blows." It is not casual. Once upon a time, such windows were in the premises for service personnel. As a rule, the servants loved gossip and gossip "from the heart." So much so that through the windows you could catch parts of the conversations.
The second explanation for the origin of the definition refers to the Manezh in Moscow, built in 1817. It was erected in tribute to the crushing of Napoleon's army. A team of local craftsmen - Slukhov - was involved in the construction. He was a renowned roofing specialist and, in fact, was responsible for this work in the Manege.
The original design of the building did not include such windows, and ventilation of the attic was not provided. Once, in the heat, the surface of the attic got so hot that the deformation of the roofing began. The incident was reported to Alexander I, and the work had to be corrected urgently. Rumors then suggested placing a number of windows on the slopes to allow ventilation of the room. Since then, such structural elements have been named after the surname of this master.
Then they came up with another use for lucarnes (their second name) - this invention was also made to reduce the load on the ceiling ceiling, in which the installed beams sagged and did not hold the mass of an impressive span. A significant draft created by the windows created a zone of reduced pressure above the ceiling. Therefore, the weight impact on the overlap was reduced and a serious accident was avoided.
Window waterproofing device
An insulating apron is included in the package. From above, above the window to be installed, on both sides, cut a piece of the crate, which is equal to the width of the drainage gutter, and in the middle of this place, cut the material for waterproofing. A gutter is wound under it and placed in the gap between the crate. As a result, water will begin to drain from the film into it, and not fall on the window.
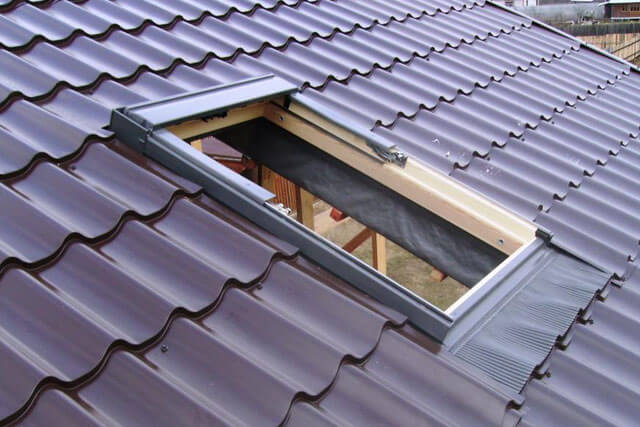

Then the apron is unfolded and placed around the window so that it prevents leaks.It is attached to the frame, the upper batten, the rafters and the timber with a stapler, after which the edges are placed under the batten, while the upper part is placed under the gutter. The roofing material under the window can now be returned to its original location.
Dormer in architecture
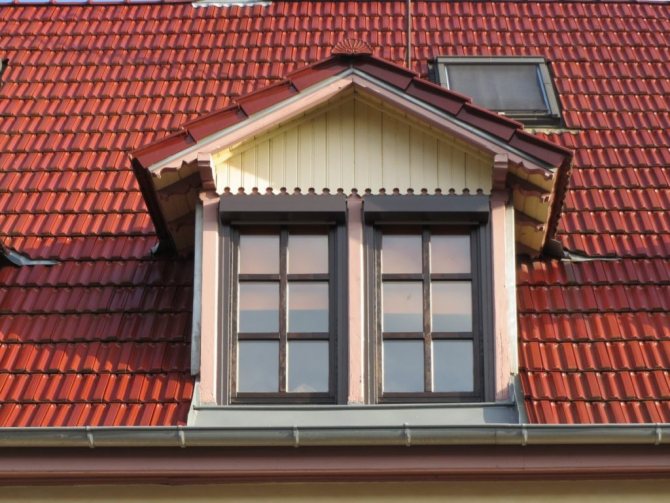
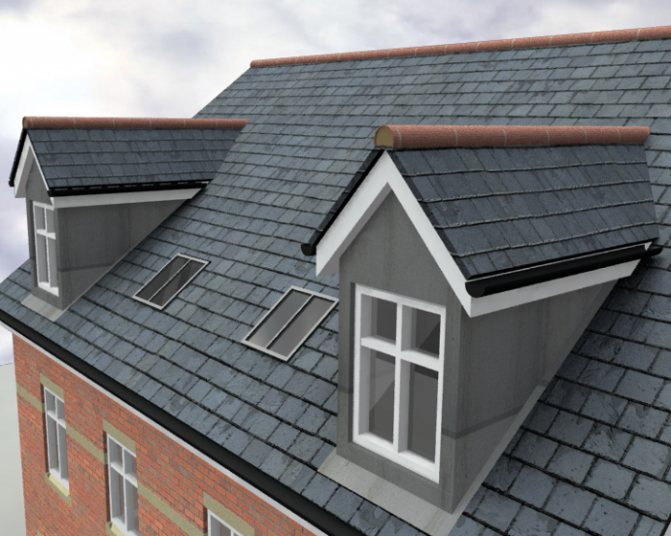
These are the windows protruding from the roofs. What is it and what are they for? The objects are equipped with their own side walls and roof, externally - miniature houses.
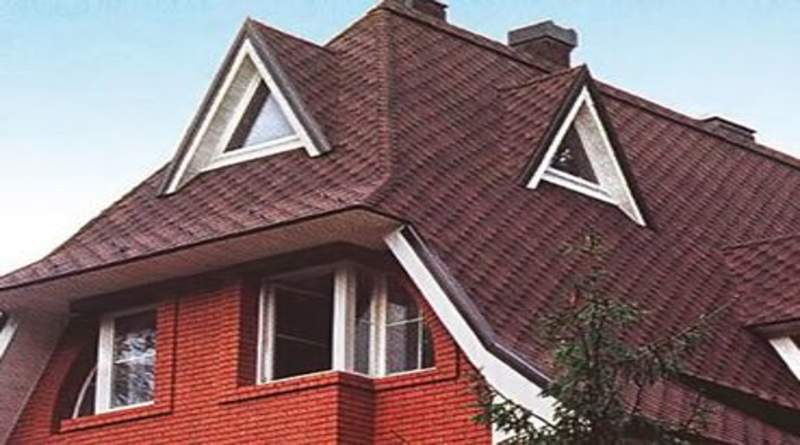

Since their inception, dormers have served several purposes. Installed on large cathedral portals in the Middle Ages, they combined:
- aesthetic purpose;
- were a tool to reduce the loads on the foundation;
- let in air and light rays.
During the Gothic period, through openings were mounted on high pediments, if not for ventilation purposes, then for the integrity of the composition. They were made rounded, and often made entirely of colored glass, like stained glass. The architects also added stone weaving to them. They liked to erect a high spire over the middle of the window. Such facilities could have vertical glazing or leave openings open.
During the Renaissance, in Europe, where a humid climate prevailed, gable roofs began to be erected on apartment buildings. With such a roofing arrangement, there is a large space between the ceiling and the roof surface. Sometimes, it could be used as a residential one. It must be ventilated.
Reference: without a dormer, which served for ventilation, moisture would collect in cold weather (and its condensation is harmful to building materials).
Despite the applied purpose, the architects of that time tried to carry out such objects in the same style with the building, and gave the appropriate design.
All the following historical intervals, such windows were more used in architecture for decoration. They were in features typical of the Tudor style in England and the château in France. The appearance of the gable windows was always performed in the general style of the building.
In house building of the 21st century. they are introduced for the purpose of ventilation, light permeability and decoration. A popular material for their manufacture is polyurethane. Resistant to moisture, ultraviolet light, chemicals, it is not "afraid" of large temperature fluctuations. On the exterior, the building material imitates wood, stone, plaster and brick textures.
Attic window
With the increase in the number of townspeople in Europe, the under-roof zones began to be made residential. Dormer windows were now arranged not only for ventilation and decoration of the space, but also for its greater illumination. At the same time, the attic windows began to play the role of a passage to the surface of the house (for performing repair manipulations and an emergency exit).
In current construction, an attic roof window is common. It is often used in private homes as:
- wind;
- observation;
- louvered;
- wind;
- domed;
- arched.
It is possible to install a small window in the attic:
- on the side of the roof;
- in the center;
- on the slope.
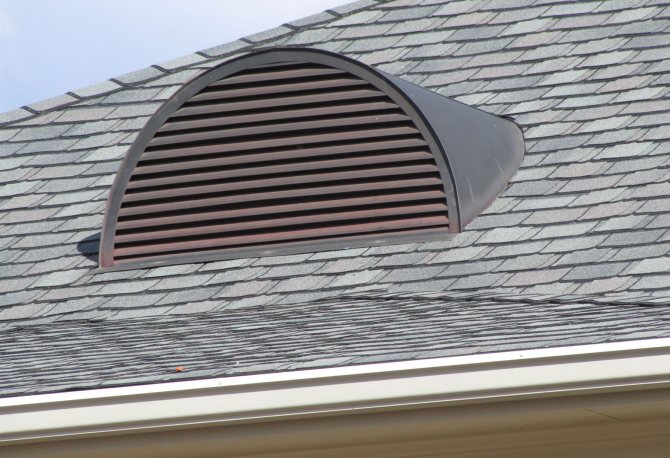
Built-in windows are usually glazed to maintain a comfortable thermal atmosphere in the building. Small semicircular windows on the gables without glass are introduced for ventilation. They can be covered with a ventilation grill that prevents debris and birds from settling in the attic.
Lucarni with vertical walls on the sides can be erected on flat roofs, the inclination of which is not more than 15 °. Attic windows are complemented by a drain. A different format of windows in the attic: a surface with one slope and a slope of more than 15 °. You can build an object with two slopes and such houses.
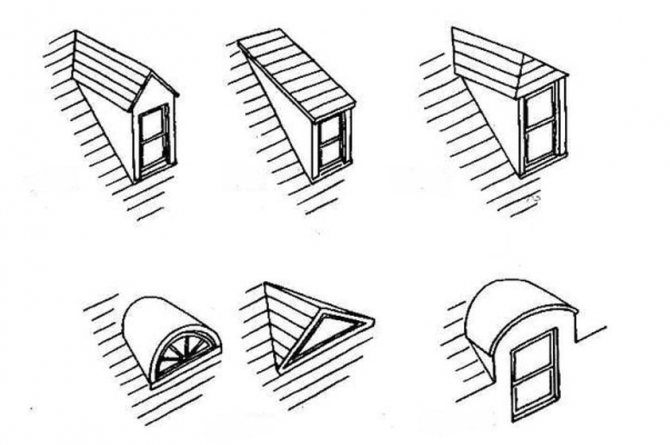
By the type of their own stern, attic dormers create:
- square;
- trapezoidal;
- semicircular;
- in the form of a rectangle;
- triangular;
- round shape.

The format and parameters of the windows are designed in accordance with the exterior composition of the building, the type of its main roof deck, and the binding to the cardinal points. The roof of the dormer house with side walls includes a layer of waterproofing and insulation according to the standards. The building material of such roof parts is usually identical to the main roof covering.
Roof window

Types of skylights for the roof.
Windows can be opened:
- on the lower axis, which contributes to protection from precipitation, but the disadvantage is the inconvenience in washing;
- on the upper axis - the movement of the window does not interfere with the access of fresh air and sunlight;
- on the lateral axis: convenient where access to the roof may be required.
- along the central axis of the window: can be rotated 180 °, which allows convenient window maintenance;
- using combined opening mechanisms.
When choosing a roof window, remember that for normal illumination of 10 m² of area, 1 m² of glazing is required. The height of installation on an inclined plane should ensure ease of use: opening windows, washing them, etc. (usually, depending on the location of the handle - 80-130 cm). The height adjustment is also given by the type of material for the roof. Some shingles cannot be cut into pieces, so you have to adjust to the boundaries of the roofing. Roof window designs may vary from manufacturer to manufacturer. Each kit contains detailed installation instructions.
The general steps are:
- opening preparation;
- assembly of the window assembly;
- dismantling the sash;
- waterproofing device;
- installation of a salary;
- installation of the window sash in place;
- activation of springs and window hinges.
Marking is made on the waterproofing layer fixed inside. The dimensions of the opening will be larger than the dimensions of the window: about 50-90 mm retreat from below for the installation of profile roofing materials, a margin of 30 mm is made on the sides, and 100-150 mm at the top. A neat cut is made in the waterproofing film with a margin of 200 mm along the perimeter (it is wrapped inward). The necessary part of the roofing material is removed, the lathing is cut out.
For ease of installation, the sash is removed and one frame is first attached. The roof window kit always has a waterproofing apron and fasteners. The latter are installed on the window frame. The edges of the insulation, which was cut out at the beginning of the work, and the insulation are attached to it with a stapler. The frame installed in the window opening will press down the insulation. A lower waterproofing apron is placed on top of the structure, and then its side and upper parts are installed.
A flashing is mounted on the insulated and insulated opening with a frame. It is selected depending on the type of roof and can be smooth or with a wave of various heights. After that, the sash is attached. The lower frame fasteners are fixed tightly immediately, the upper ones are not fixed completely: so that you can check the evenness of the gap and adjust the skew.
Adjustment is mandatory for all window elements: moving parts must be activated, checked for functionality and adjusted. After the window has been mounted and checked, it is time to start finishing work - installing slopes. The trick for a structure located at an angle to a horizontal surface is that the plane of the floor is taken as a reference point, not the frame. The lower slope is oriented perpendicular to it, the upper one - parallel. To ensure ventilation, the side slopes are made at an angle of 120 °.
Installation of a roof skylight
Dormer windows are objects that require compliance with SNiP and GOST decrees during their creation. According to SNIP, the installation of auditory elements is allowed when the angle of inclination of the roof is more than 35 °, and their area ("S") is equal to 1/300 of the area of the horizontal projection of the roof of the house.
In order for them to perform their functions correctly, they are done as follows:
- walls on the sides up to 1.5 m in height;
- in size 1 / 5-1 / 8 of the entire "S" attic;
- window sills are arranged at approx. 90 cm from the floor;
- the dimensions of the windows are more correlated with the style of the building, but they rarely exceed 1.5 m;
- the dimensions of the flaps are required to be more than 0.6x0.8 m;
- the frame must be placed on the beams overlapping the ceiling;
- the object should not have a protrusion beyond the outer walls of the house (to avoid sagging);
- the gap between 2 dormer windows must be 0.8 m or more.
During the reconstruction of the building, installation is carried out with partial dismantling of the roofs. So, it becomes possible to install side walls and the top of the hatch. Dormer windows, created during the reconstruction of structures, are introduced between the rafter legs, which are located at a distance of approx. 1-1.2 meters. Then, the roof structure remains strong.
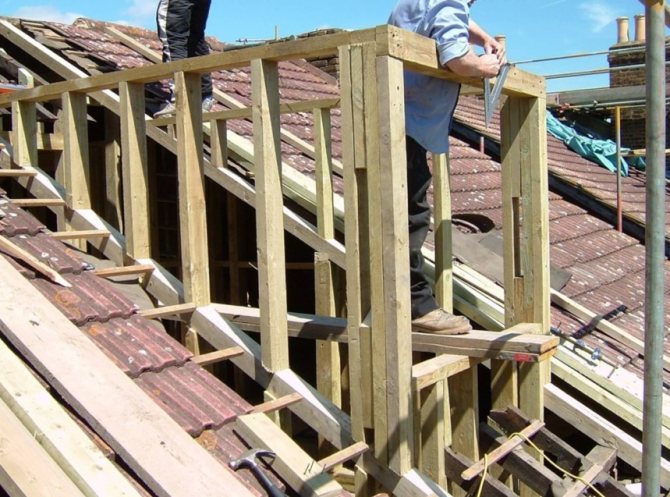

Installation of a skylight on the roof
The walls of objects in the attic are made of the same building material as on the facade, or of wood. Frames are often wooden. Often they choose aluminum, PVC or fiberglass. If desired, for decoration, it is possible to purchase and install various elements of the frame, from a material suitable for the style.
Important: before the introduction of such a window, it is recommended to inspect the roof and check its integrity. She must have sufficient strength for this type of work.
In order to carry out the installation work correctly, measurements and structural calculations are made, and the technological sequence is observed.
| Stage | Recommendations |
| Locating windows | It is better to install them between load-bearing ceilings |
| Window opening dimensions | must be small in order to have good thermal insulation functions |
| Assembling the frame | Good from wooden blocks that have been pretreated with an antiseptic |
| Cutting a hole from a roofing pie | Made carefully so as not to harm the waterproofing layer |
| Frame installation | It is done using a frame, which is tightly fixed with self-tapping screws to the supporting rafter system |
| Post-treatment with sealant | Traversed along each seam and connection points |
Table. Installation sequence
It is necessary to place the window block at a specific distance from the load-bearing wall. It is allowed to erect windows in 2 rows. You cannot mount the elements close to the ridge, cornice and pediment.
Attention: when calculating the number of windows, it is required to comply with the rules of proportion: the sum of the width of all openings must be more than half the length of the attic.
Choosing the type of window and installation location
The parameters of the opening are selected taking into account the quadrature of the attic room and the gap between the rafters. It is desirable that the window is located between the rafters.
According to the accepted rules, the size of such a window should be at least 10% of the area of the room. Its width should be made 4–6 centimeters less than the gap between the rafters. When it is too small, for example, 60 centimeters, you can mount two windows side by side, placing them in adjacent sections.
The installation height is influenced by the angle of inclination of the ramp and the location of the handle on the window. On steep roofs, it is advisable to place the window opening at the bottom, and on shallow roofs, at the top. For a window, in this case, the optimal distance from the floor is approximately 80–130 centimeters. When the handle is at the top, the window structure is mounted at a height of 100-110 centimeters, and if at the bottom - 120-130 centimeters.
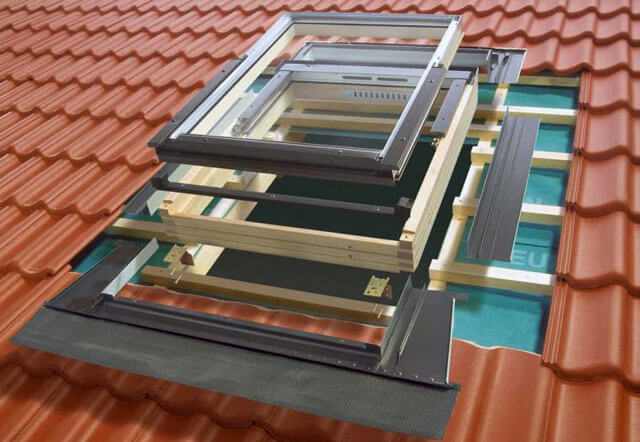

In addition, the type of roof covering affects the window height. For example, when you plan to install ceramic tiles, you need to remember that you cannot cut them. The window in this case should be located above the tiles. If the products are sheet, you can cut holes in them in the right place. By the way, so that the window does not fog up, does not undergo icing, condensation does not collect on it, a heater is placed under it.
When the number of windows, their parameters and the place of installation have been selected, you need to correctly purchase a flashing for them. Window products from different manufacturers have their own characteristics and differences in equipment. Window accessories should be selected from a specific manufacturer from one product line, which can be seen from the markings on the products.
Dormer windows
The design of these windows meets many tasks, and therefore the requirements for its device are high.
It should be ensured:
- Reliable durability.
- Decent lighting.
- Good ventilation.
- Visual harmony with the architecture of the house.
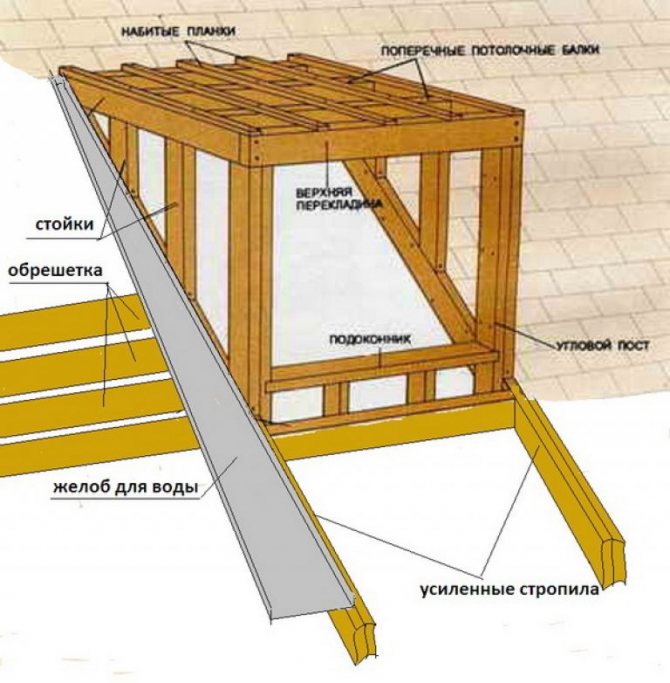
The window roof system is equipped with its own rafter base, battens, roof decking and downpipe.
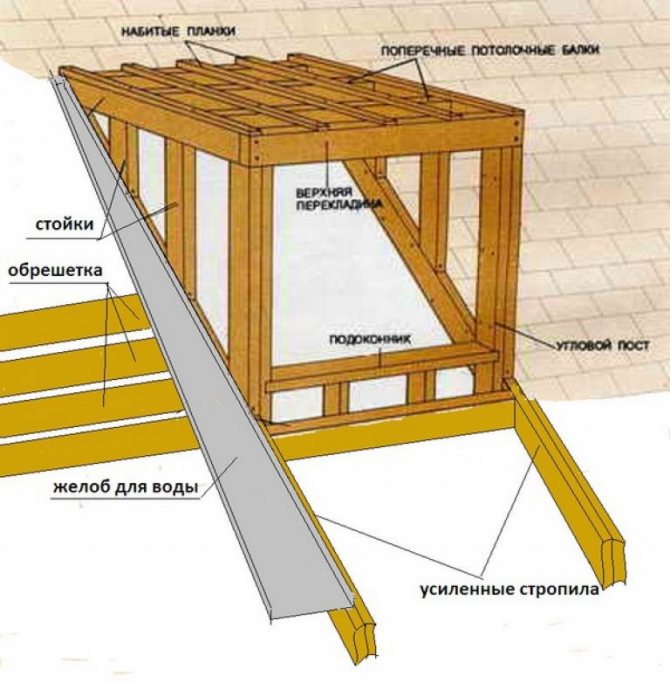

The creation of the object follows the rules of the roofing pie. When constructing the auditory object, the following technological process is followed, and only the elements specified in the project are used.
The technical process begins with the design and development of the drawing. Here, the properties of building materials are taken into account, and calculations of loads (wind, temperature, precipitation) are made. Fasteners and connection elements are selected. Make decisions on waterproofing, drainage and sealing. People choose:
- type of construction;
- number of windows;
- dimensions of the structure (in accordance with the bearing properties);
- method of attachment to the roof of the building.
Note: the project of the skylight on the roof must be done by a person who is versed in construction.
The frame is installed according to the rules for the construction of a standard roof with a rafter system and lathing, roof covering, fixing the drain pipe, erecting a ridge and providing protection to the junctions.
The work is being carried out in parallel with the installation of the main roof of the building. If the object is built into an existing roof, then it is enough to determine the place of implementation and follow the rules of SNiP:
- The place of the future frame is pre-strengthened with rafters. An insert into them cannot be done, in order to avoid a decrease in the strength of the roof.
- Horizontal timber beams are fixed parallel to the outside walls of the house. Then the vertical ones are added.
- The parts are connected with a single transverse bar. The formed frame is attached to the upper beam. The joint of the elements takes place with the participation of metal devices: bolts and anchors. A cut or cut will not create the required strength. Before fixing the parts, make horizontal and vertical alignment of the beams.
- The lathing is installed on a frame with the participation of bars or a galvanized profile. The distance is 50 cm.
- After the frame part, the ridge beam is erected and the assembly of the window rafter area is done.
- The gables are sewn up with plywood (moisture resistant) flush with the outer wall.
- A layer of waterproofing is fixed from the inside (pass through with sealant along all joints). If you need insulation.
- They cover the roof, often with the same building material as the roof area of the house.
- Fastening the sheathing to the lathing. Here, a material is used that is suitable for finishing the room, or wooden strips in a horizontal or vertical position.
Advice: it is wrong to cover the surface with plaster when cladding, its structure is not able to resist the running rafters under the pressure of wind loads.
Facade wall cladding is often made of steel siding. This building material is practical and provides reliable protective functions. Visually, it ennobles the walls of window objects and brings harmony to the style.
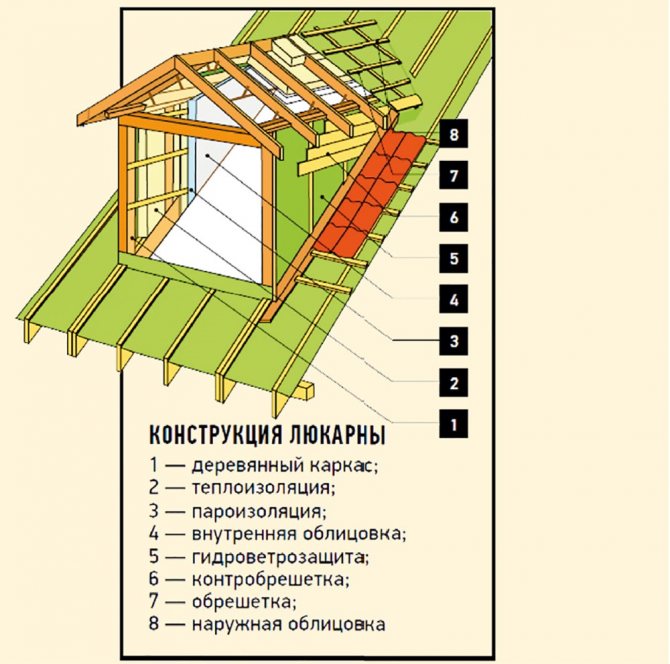

The device of the lucarne in the section.
How to do it yourself?
Algorithm:
- Erect the frame and install the lathing with an interval of 50-55 cm.
- Introduce a skate.
- Assemble the rafter system.
- Install the frame to the rafter legs of the roof (if from scratch) or cut out a place for it (in the existing roof, where the supporting logs cannot be damaged).
- Secure the frame.
- Sheathe the gables with plywood (waterproof).
- Attach a waterproofing layer.
- Cover the object with roofing building materials, and avoid mistakes in the adjacent zones (so that in the future there will be no places for moisture to leak).
Inside, such objects are sheathed with an appropriate finishing board or ordinary clapboard. Building mixtures, by the type of plaster, are not used in these works.
Preparing a place for a window
There is a certain order of how to make a skylight correctly. In the case when the roof is ready, and there is no interior decoration, the location of the opening is marked from the inside of the room on the waterproofing material. The distance from it to the elements of the rafter system should not exceed 2-3 centimeters.
The window in this situation is mounted on the rafters and the lower beam. Further, its lower location is outlined, 9 centimeters recede for profiled materials, and 4-6 centimeters for flat materials. Then they mark the top point of the window structure and lay 9-15 centimeters up.
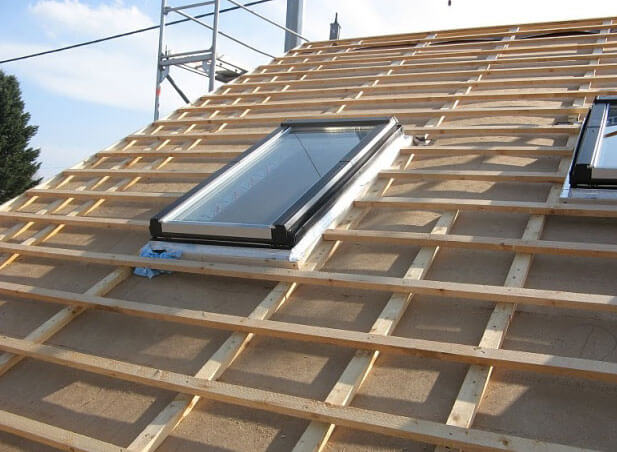

Cutting out the waterproofing film, a 20-centimeter stock is left around the perimeter. The remains of the canvas are wrapped inside the attic, the roof covering is removed or a hole is cut out in it. The elements of the lathing are cut off, departing 2 centimeters from the rafters.
At the bottom of the window, a mounting bar is placed, having a thickness of at least 50 millimeters, at a distance of 8-10 centimeters from the lathing. It is mounted horizontally according to the level. The lower end of the waterproofing is fixed with a stapler to the timber, and the upper end to the crate. In this case, the side edges are taken out.
Types of dormers
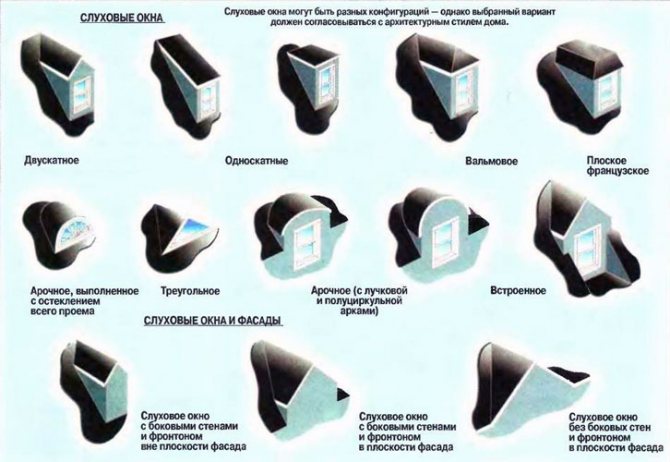
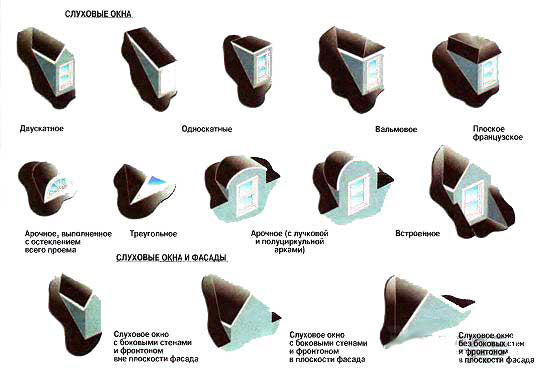
The popularity of dormer windows has remained for a long time. Changing outwardly, they are always in fashion. Modern elements are significantly different in their design and external indicators. Their views include objects installed directly into the plane of the roof, and with glazing vertically:
- with a pediment in the plane of the house, without walls on the sides;
- with pediment and side walls;
- with walls on the side and a pediment outside the plane of the building.
Small arches, trapezoids and triangular shapes are common in construction. In them, the entire vertical part is glazed.
A dormer with side walls is subdivided according to the type of its own roof:
- with one slope;
- gable;
- hip;
- by the shape of the arch;
- French with a flat surface.
The location and type of windows are selected for a single style of the house so that the integrity of the roof is visible.
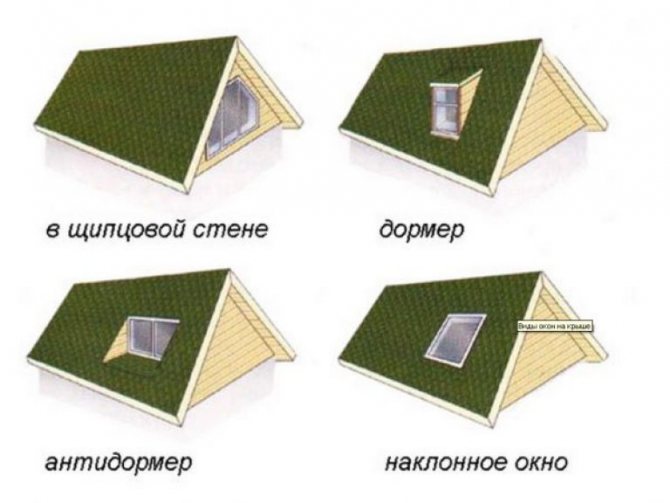
The existing types of construction are classified according to the main types of object position:
| A type | Being on the roof |
| dormer | above the surface |
| antidormer | inside the roof |
| in the gable wall | from the butt |
| tilted window | in its plane |
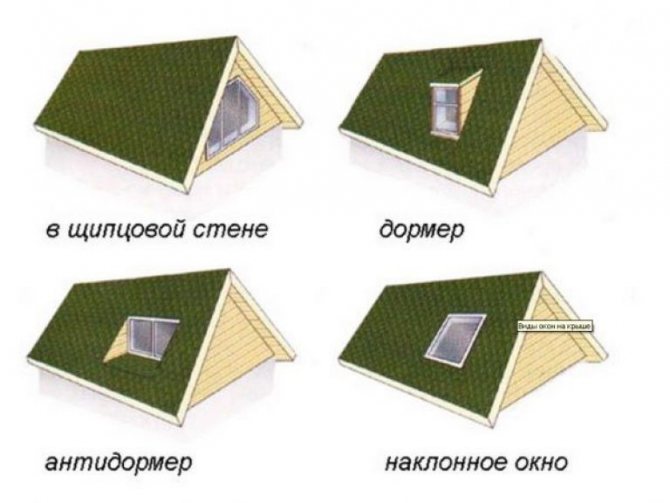

Dormer views are common in the construction of private houses. This is explained by the significantly more profitable performance of the functions of adding usable space to the room.
Do-it-yourself roof frame installation
Included with the window products there is always an instruction from the manufacturer on how to make a skylight. It is necessary to follow it, since the design of window products for attics and the methods of their installation are different.
For example, in some cases the brackets are rectangular and need to be fixed only on the rafters, while in others they are coal and attached to the lathing or to the rafters. But the main thing is that these products are fixed on the frame in different positions.
In order for the sash to be conveniently mounted, it should be removed as described in the instructions. It is necessary to leave a bare frame, therefore, if there is a salary on the window, it is removed.
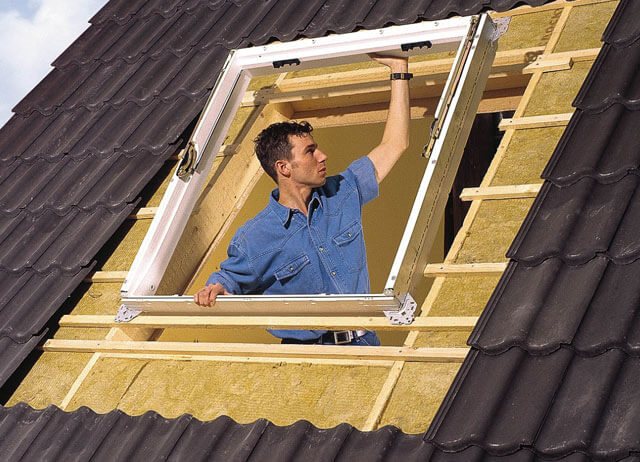

Brackets are installed on the frame. Further, mineral wool is usually placed on its upper part and fixed with a stapler. At the bottom of the window, the insulation is placed on the timber, after which the frame is inserted into the opening and the heat insulator is pressed down.
The lower brackets need to be fixed completely, and the upper ones not completely, since the frame will still have to be adjusted. The sash is returned to its place, covered and checked for distortions.Adjustment is carried out using the top mount. As a result, the window should stand absolutely level, and the sash should fit evenly on all sides. In the future, it will be impossible to eliminate the shortcomings.
After completing the adjustment, all fasteners must be tightened securely. Next, the side waterproofing is fixed to the window frame, the excess is cut off. Insulation is placed in the side openings.
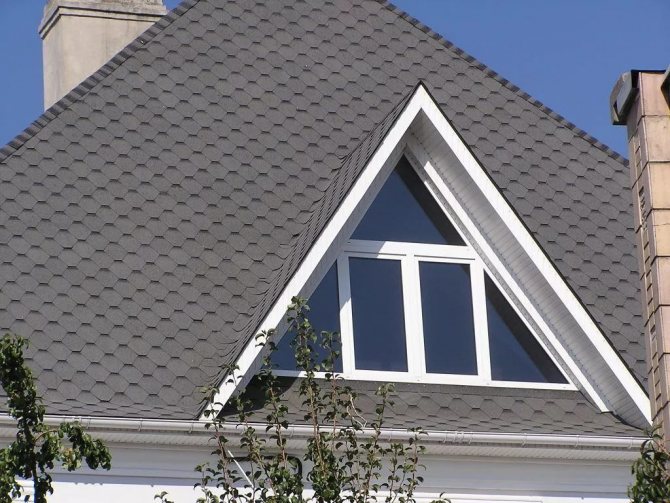
Triangular dormer
A widespread type of lukarens by the type of their own roofs are triangular shapes with steep slopes. The owners of private estates located outside the city “fell in love” with this format.
A distinctive feature of the style is the lack of recesses in the pediment wall with a dormer window into the roof. It is installed flush with the outer wall of the structure.
Due to the fact that the height under the island roof is impressive, the objects are complemented with large frames. It is also possible to add details similar to cathedral vaults.
A triangular dormer window is built on a common axis with a house window installed below. This technique allows you to create a harmonious facade concept. Lucarni, at the same time, neatly "fit" into the exterior.
Such windows are usually mounted on roofs with steep 64-degree slopes. There they do not add useful space. But they solve the problem with moisture. Due to the window, it does not accumulate in the room.
The roof of the dormer goes down to the main roof of the structure to the gutter, and waterproofing of the docking area of the walls on the sides is not required. This makes it easier to seal the attic roof window and the entire building surface.
Varieties of service windows
Today manufacturers offer three types of service windows: specialized hatch windows, universal hinged roof windows and escape windows.
Service windows-hatches
Service windows-hatches are intended for installation in unheated rooms under the roof. These can be both cold attics in capital houses and attic rooms in seasonal summer cottages. Provide convenient and safe access to the roof and effective ventilation of the room. The hatch windows are installed in roofs with an angle of inclination from 15 to 70˚, models are produced with opening along the upper hinges at an angle from 120 to 180˚, as well as with side opening at an angle of up to 90˚.
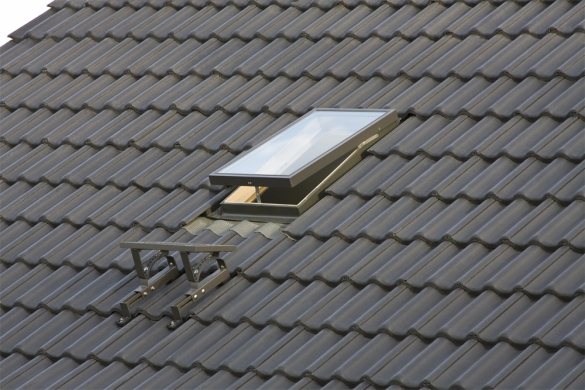

The hatch frame is made of pine, which has been treated with an antiseptic in a vacuum chamber. The cover can be made of both high strength polycarbonate and a single glass unit with tempered glass. In both versions, glazing reliably protects the room in all weather conditions (rain, hail, mechanical stress).
forester 1976 FORUMHOUSE member
A residential insulated attic is planned, but a mansard hatch window has been installed for cold unheated attics (I could not control the roofers due to a broken leg). The attic is not yet insulated, the roof is metal. Rafters 200x50 mm, pitch 540 mm, VVZ membrane. Perhaps leave this window and not bother? Or is it necessary to dismantle and install the insulated version? I called several sellers of roof windows in our region (Rostov-on-Don), they say that many put them in insulated attics, there were never any complaints. The insulated version costs three times more and, due to the lack of demand, is only available on request. As an option - is it possible to put an ordinary dormer window, not a hatch, given that you will have to leave it no more than once every ten years?
Dmitry MileshinHead of technical Department of FAKRO-Russia
Hatches are only suitable for cold attics and seasonal homes. If such an option is installed in an insulated attic, then there is a high probability of condensation due to the large temperature difference between the street and the room. In your case, the best solution would be a model of a thermal insulating universal swing window.The model is equipped with a double-glazed window with high frost resistance parameters and a warm frame, due to which the room will be warm and dry. During installation, the hinges can be installed on either side, which will allow the window to open both to the left and to the right. The model has a side opening at an angle of up to 90 °. Supplied complete with insulating flashing.
Universal swing window
Like hatches, a heat-insulating hinged window with a frost-resistant glass unit for warm heated rooms can be used for access to the roof for maintenance and as an emergency exit in emergency situations. Easy opening and holding of the sash in a given position is provided by a gas shock absorber, it also prevents the possibility of accidental slamming of the window. The optimal slope angle for installing a swing window is 15-55˚, the insulating flashing is selected based on the type of roofing (for flat and profiled roofs).
Evacuation window
As well as a swing window, the evacuation window is designed for installation in operated and heated mansard rooms. Such a window model can be used as an emergency exit element in accordance with fire safety requirements. It is equipped with an energy-saving glass unit, an insulation system and seals. But unlike the previous model, the evacuation window opens along the upper hinges, in the working position the sash opening angle is up to 40 а, and in the case of using the window as an element of an emergency exit, a slight push on the sash release holders raises it to an angle of 68 °.
When installing in pitched roofs, it is recommended to install additional service windows with special steps for access to the roof.
Arrangement of a triangular object
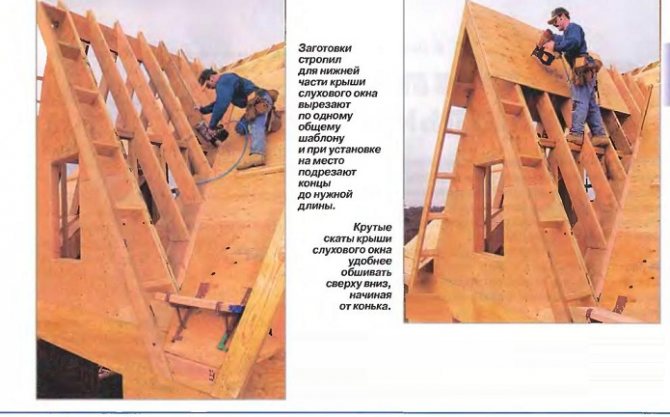
The introduction of such an object, in the shape of a triangle, requires a different approach. Its creation is similar to work on a multi-gable roof. The difference in approach is the angle of inclination of the triangular faces is 60-70 degrees, while the multi-gable surface is different.
The inclined slopes of the window roof are connected by the formation of unusual gutters (valleys).
To create such an object, mowing and sawn rafter sticks are used. To mount the parts, calculations of the length and section of the gutter rafter, the ridge and the angle of its conjugation with the walls of the window are needed. For all triangular openings, a supporting pair of beams is required, symmetrically positioned.
