There are many ways to make underfloor heating in an apartment or private house, but using a heating cable is the simplest and most inexpensive option, so it is in great demand.
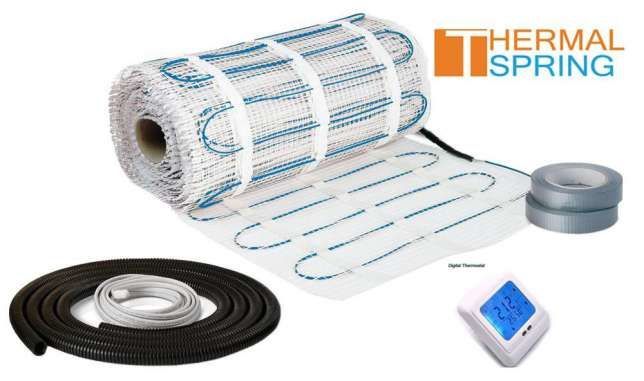
Electric cable underfloor heating
The heating cable is a copper wire that carries an electric current. To increase performance, it is placed in a special fiber winding and heat-resistant polyvinylethylene. Thanks to this design, the safety of its use is also ensured. Electric current, passing through the wire, releases thermal energy, due to which the surface is heated.
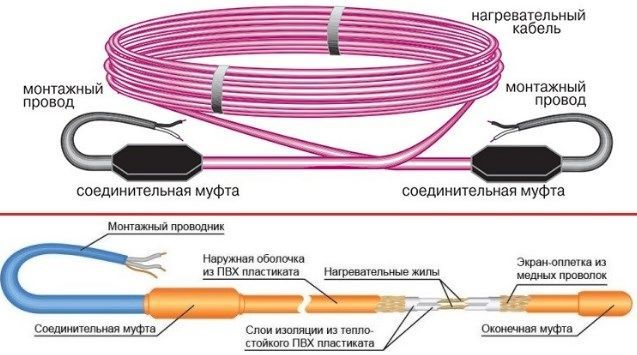

Heating cable device
Electric cables for concrete screed have different power: from 15 to 40 W / m, can be heated up to 90 ° C. Galvanized steel or copper acts as a conductor - cores. Any wire is designed for a traditional electrical network with a voltage of 220 V.
Resistive heating cable
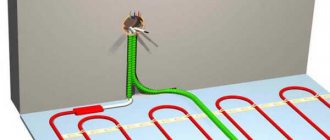
An electrical wire of a resistive type for underfloor heating has one or two cores, which are placed in an insulating sheath, and couplings are installed at both ends, with the help of which it is connected to the electrical network. If a single-core wire is used under the screed, then a closed circuit must be provided. This means that the cable must be placed on the floor in such a way that both ends fit into the back box.
Raychem T2BLUE resistive cable
If a two-wire wire is used, then the presence of a second conductor ensures that the current circuit is closed, therefore only one end is placed in the box, and a plug is mounted on the other.
A two-core cable has a more complex structure:
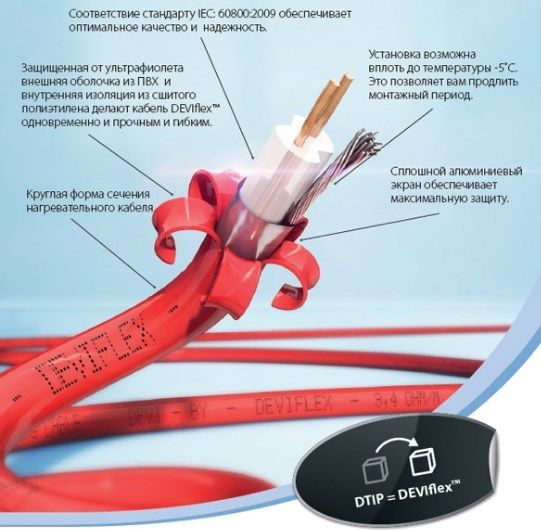

Two-core heating cable for underfloor heating
- both cores are enclosed in an insulating material such as silicone rubber;
- two wires are combined with fiberglass;
- tinned copper conductor is used for grounding;
- aluminum foil protects the conductor from local overheating;
- the whole structure is enclosed in an outer shell made of polyvinyl chloride.
A single-core cable has one significant advantage - the price, while a two-core cable is 20% more expensive. The two-core cable is simply laid under the screed - you can use any convenient method, without having to return the other end to the box.
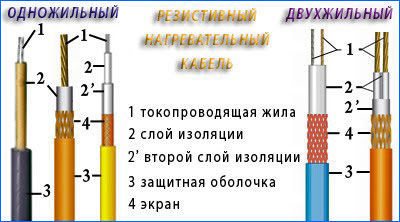

Single-core and double-core cable
The resistive wire constantly emits heat when connected to the mains - this is its main disadvantage. Because, if heat energy is cut off the output, it will contribute to overheating of the wire and a short circuit will occur. You cannot lay such wires in those places where you plan to arrange furniture.
Preparatory work
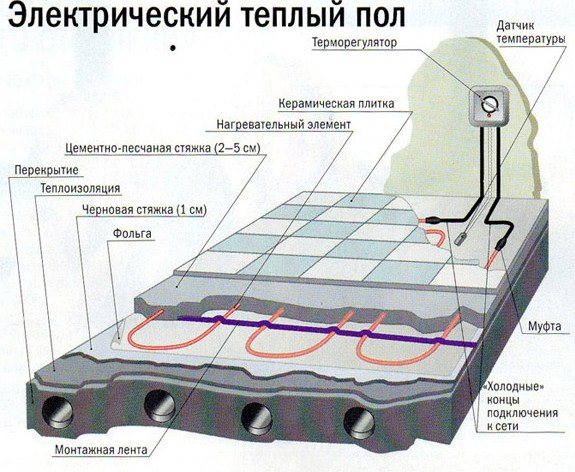

Electric floor diagram.
Before laying a warm electric floor with your own hands, you will need to prepare the surface. Before installation, you first need to remove all furniture, old flooring from the room.
The next step is leveling the surface. It should be perfectly flat. Garbage is removed. It is advisable to make a cement screed. The thickness of the cement mortar layer is 3-7 cm.
With a thinner layer, it can crack and collapse over time.
After all this, they begin to lay the insulation material. Insulation is necessary to make floor heating more efficient and economical.
Insulation is placed between the layer where the cable is located and the base of the floor. This will save about 30% in heat loss.
Thermal insulation can be installed both vertically and horizontally. It will be located vertically along the perimeter of the walls at the base of the floor. It is better to use a damper tape for this purpose.
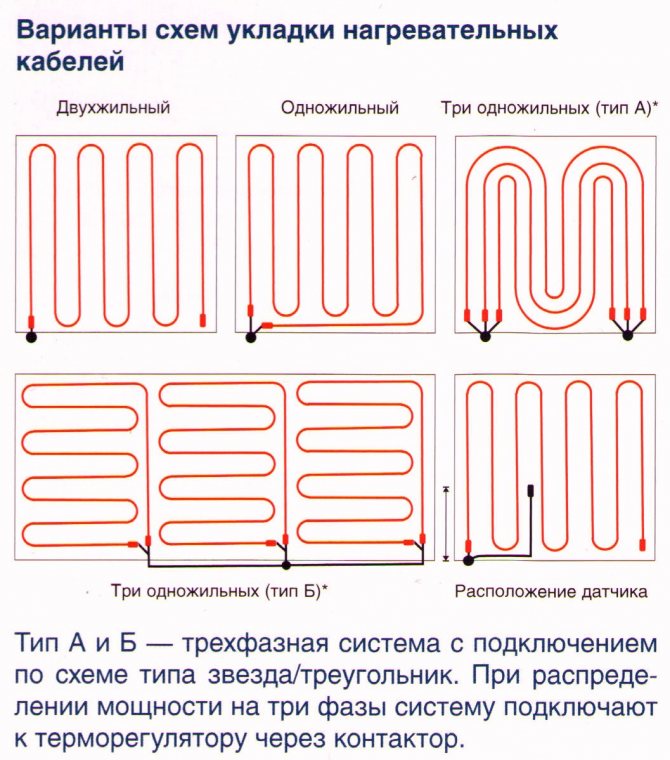

Layout options for heating cables.
A good option is expanded polystyrene in the form of sheets 15-20 cm wide. The thickness should be about 1 cm. Expanded polystyrene has low thermal conductivity, this material is made on the basis of foam and is currently one of the highest quality materials.
Horizontal insulation is required for the concrete subfloor. The thickness of the sheets is more than 2 cm. The insulation must be durable and withstand high loads.
Expanded polystyrene, expanded polypropylene, cork, mineral fiber boards and other materials are well suited for this. The thickness of the insulation depends on the required degree of insulation, on average it is 20-50 mm.
If a warm electric floor is installed in a damp room, then a waterproofing layer must be placed on top of it.
Application of cement-sand screed
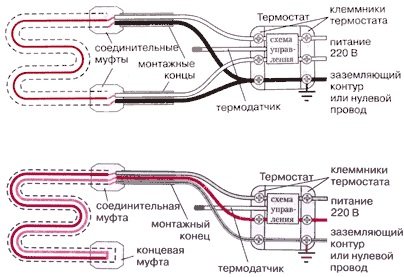

Design features of a self-regulating cable.
A warm electric do-it-yourself will require the organization of a cement-sand screed. It is applied to a surface with thermal insulation. The composition of such a floor mortar is prepared from cement powder of grade 400 and sand in a ratio of 1 to 3. The sand should be used only after preliminary cleaning. Water is added until the desired consistency is obtained. This can be done with a mixer or a stick.
To do this, take a large-volume container, pour the resulting mixture with water at the rate of 1 liter per 5 kg of the mixture. First, water is poured, and the mixture is added to it. The screed will prevent overheating of the cable, and the warm floor will be less dangerous. The sand-cement coating makes the warm electric floor smoother and harder, which will provide a solid base for the wire.
Underfloor heating does not necessarily imply the use of a screed. If this is not provided, then the cable is placed on a layer of insulation with a special metal mesh. Its cell should be 1-2.5 cm, no more. Thanks to her, the design is more durable. When the mixture applied to the surface hardens, you will need to cover the warm floor with a special mounting foil. It is put on the entire area with a margin, but so that there are no folds and irregularities. The edges are glued together with foil tape.
Foil is needed so that the warm floor warms up more evenly. Underfloor heating involves laying and fixing the cable. To fix the latter, it is recommended to use mounting tape. It is attached to the prepared surface every half a meter using self-tapping screws or simple nails. It is better to fix the cable itself with the help of brackets, which are located at a distance of 25 mm from each other along the entire length of the cable.
Heating cable installation procedure
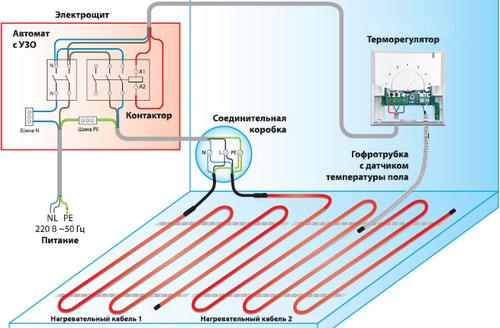

Wiring diagram for electric underfloor heating to the electrical panel.
The warm floor will not be able to work without a cable. This is the next stage of installation. Before unwinding the cable, you need to check its resistance, it must match the passport data. They put a warm cable with their own hands in increments of 20-25 cm. It is important to remember that the cable should not intertwine and touch its parts. The surface covered by the warm cable must be at least 80% of the entire area of the room.
Do not put it in places where heavy furniture and equipment are located, do not cut off the remainder of the cable. The distance from the walls is made at least 5-7 cm.
The cable termination, if it is two-core, is fixed on the mounting tape so that it is completely covered with a concrete screed. If a solid wire is used, then both ends will be fed to the thermostat. Further, a warm electric floor will require the installation of temperature sensors and a thermostat.
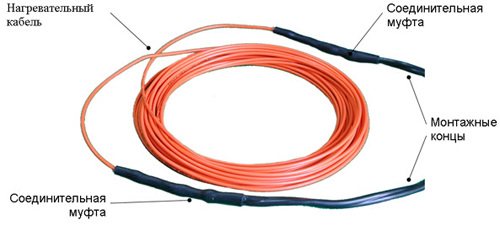

Electric underfloor heating cable.
To install the thermostat, a recess is cut out in the wall and a strobe is made up to the floor. With the help of alabaster, an installation box for the thermostat is installed, from where the tube comes, it is placed in the strobe along with the supply end of the wire and covered with alabaster. The end of the tube is placed in the heating area at least 40 cm.
The temperature sensor should be in the center of the wire turns. The end of the tube is covered with electrical tape. The warm electrical flooring must subsequently be poured with a cement-sand mortar with a layer of 3-5 cm, prepared according to the above technology. You can use a warm electric flooring after the mixture is completely dry, but before that you need to make a finishing coat. Tiles are better suited for this. Drying time of the screed is at least 30 days.
Self-regulating cable
A shielded or self-regulating cable for underfloor heating is a matrix, inside which there are two conductors, and between them - a layer of polymer, which releases the necessary thermal energy. The peculiarity of this cable is that it regulates the heating due to the resistance of the polymer. As the temperature rises, the resistance also rises, which leads to a decrease in the current strength and, as a result, the amount of heat generated decreases.
Self-regulating heating cable braid
Thanks to this structure, the self-regulating cable is also quite economical, therefore, over time, it will justify the funds invested in its purchase.
Shielded wire composition:
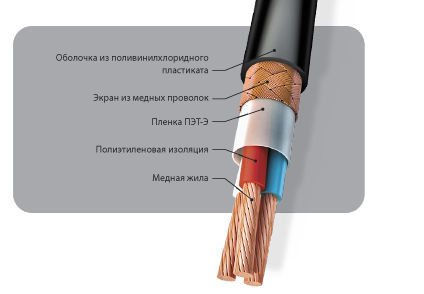

Shielded heating cable design
- carbon conductor;
- polymer;
- insulation;
- reinforcing braid;
- external PVC insulation.
Despite the ability to control overheating, such a cable is also not recommended to be laid under furniture, since this will increase electricity consumption, but will not provide the desired effect - it makes no sense to heat the cabinet.
We calculate the cable and prepare for installation
For heating to be productive, the cable must cover at least 80 percent of the room. Before the start of the installation process, the resistance of the cable sections is necessarily checked, a deviation from the passport indicators by about 10 percent is allowed.
Important! The cable does not need to be laid in places where there are heavy appliances or furniture.
When laying the cable from the walls, you need to retreat six to seven centimeters.
Important! When calculating the cable pitch, use the following formula: centimeters per pitch = heated area x 100 / cable length.
Heating mats
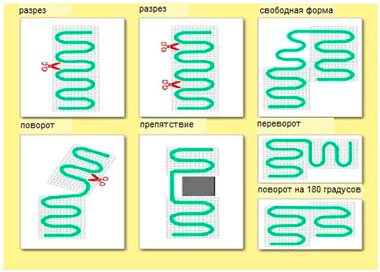

Methods for cutting and bending the heating mat
To simplify the installation of underfloor heating using a heating cable, special mats have been developed. They consist of a mesh base on which the heating elements are fixed.
The main advantage of this design is that it is possible not to make a concrete screed, but it is allowed to immediately lay the finishing layer on top (tiles are most often used).
The installation of the mats is very convenient, since it is easy to change the direction; they can be laid in any order, bypassing the places where the furniture is located. Most often, a resistive two-wire cable is placed in the mats.
Laying the heating mat
Electric floor installation methods
There are three main ways of how you can install a warm electric floor with your own hands:
- installation under a concrete screed;
- laying under a tile on a screed;
- installation under linoleum, laminate and other floor coverings.
The first method is most often used for living rooms and bathrooms, a kitchen or a loggia. It consists in the installation of cable floors. Insulation and a waterproofing layer are placed under the system. A screed is laid on the heating elements, but only in a small layer.
It is worth noting that if the room located below is heated, then there is no need to lay a layer of thermal insulation, since the glue and the tile itself will perfectly cope with this task. But before making such decisions, it is recommended to carefully study the manufacturer's instructions in order to find out the possibility of certain actions.
If you have a finished floor with laminate or linoleum, and you do not want to tear down the old screed, you can use a film electric underfloor heating. This installation option will be the easiest to do it yourself. But the installation of insulation in this case is required. It is best to use polyethylene foam and foil for this. You need to place such material directly on the screed. After that, the electrical elements are installed, if necessary, a waterproofing layer can be added. After that, the laminate or linoleum should be returned back.
The heated floors themselves are divided into the following types:
- cable;
- cable with reinforcing mesh;
- film or infrared.
It is important to take into account that the latter option can neither be laid under a tile, nor mounted in a screed.
The most common brands of heating cables and their characteristics
On the Russian market, there are both domestic manufacturers of electric cables for underfloor heating under screed, and imported ones.
| Brand | Section length, m | Power, W / m | Maximum operating temperature, оС | Service life, years |
| Single core cable | ||||
| National comfort, NK-250 | 17 | 15 | 90 | 15 |
| Teplolux | 10 | 14 | 90 | 25 |
| Neoclima | 5 | 15,2 | 100 | 35 |
| Two-core cable | ||||
| Ceilhit | 8,1 | 18 | 100 | 25 |
| Teplolux Elite | 15 | 27 | 90 | 30 |
| Raychem t2 | 14 | 20 | 100 | 35 |
| Self-regulating cable | ||||
| Optiheat 15/30 | 15 | 30 | 100 | 40 |
| Devi-pipeguard 25 | 25 | 30 | 85 | 30 |
| Heating mat | ||||
| NeoClima | 0.65 m2 | 105 | 80 | 25 |
| Electrolux EEFM | 2 m2 | 150 | 80 | 35 |
| National comfort | 0,5 m2 | 130 | 90 | 25 |
Electric floor heating installation video
The electric underfloor heating system is constantly gaining in popularity. This is not only additional comfort, but also savings on heating the house due to the main heating system. It is very convenient that you can lay a warm electric floor with your own hands without prior training in technology.
Today, almost every person who is faced with repairs and with the problem of cold floors in rooms resorts to this newfangled way of creating a comfortable indoor climate.
Rules for installing a warm floor with an electric wire
For an electric underfloor heating, it is necessary to provide a perfectly flat surface of the rough base, since there may be air in the voids, which will lead to the burnout of the resistive element. On the subfloor, a thin screed from 3 to 5 cm is recommended.
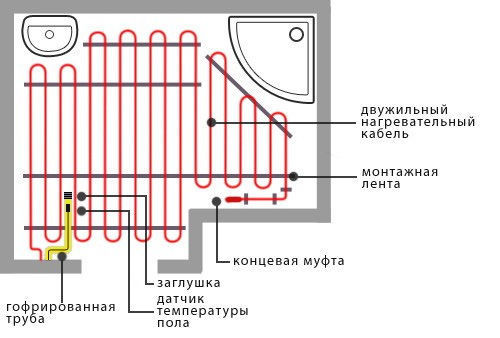

Installation diagram of the electrical cable on the floor
Next comes thermal insulation. The thickness of the material should be at least 2 cm, but if this is an apartment on the ground floor, it is better to choose a thicker one. When choosing a material, you should pay attention to heat resistance - it must withstand heating up to 100 ° C. It is better not to use a foil-coated material - the foil will quickly deteriorate under the influence of constantly high temperatures. An alternative is a metallized coating - it will reflect heat and direct it upward.
Self-installation of an electric underfloor heating
Both rolled insulation and slabs are used. One condition is that you must not allow cracks in honey with canvases. If underfloor heating is installed in a bathroom or kitchen, waterproofing materials should be used. They will prevent the penetration of unwanted moisture.
Thick plastic sheeting is most commonly used. The next stage is the installation of heating elements. It can be carried out on a special mounting tape, which has fasteners for the cable. You can replace it with a reinforcing mesh, the cells of which do not exceed 1.5 cm.
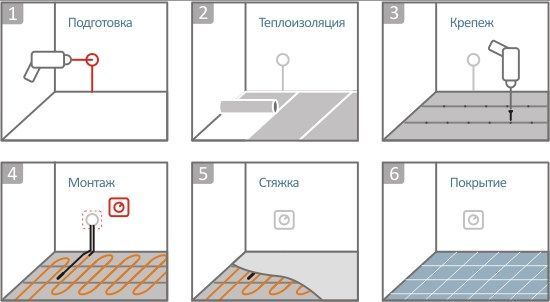

Stages of installing a warm floor with an electric wire
The next stage is the screed.Any material that can withstand high temperatures can be used. This is either a concrete composition with the addition of polymers, or ready-made dry mixes for a warm floor. Before pouring the screed, it is necessary to check the performance of the heating system. The test is carried out using a tester that measures the maximum resistance. Deviations within 10% of the data specified in the wire passport are allowed.
The main design flaws
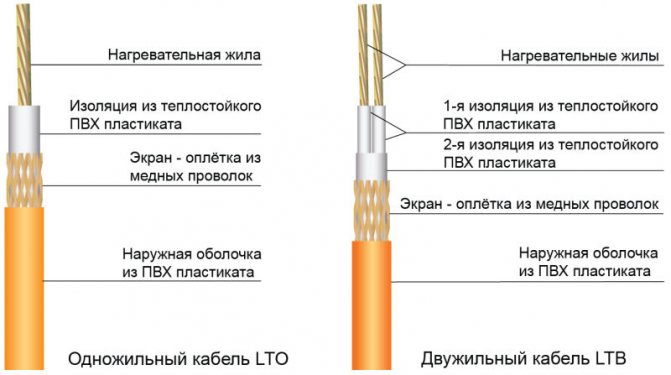

Types of heating cables used for underfloor heating.
Before building an electric underfloor heating with your own hands, you need to weigh well the pros and cons. In addition to all of the above, an electric floor heating has a number of disadvantages. The most important of them is, of course, the high demand for electrical energy.
In some houses that were built decades ago, such an electric floor will not be able to work, since the electrical supply is calculated differently and does not imply such energy consumption. Due to all this, the electric floor in such houses can only be considered as an additional heating system, and not the main one.
The second disadvantage is associated with high financial costs, which limits the use of equipment on an ongoing basis. For example, the electricity costs associated with floor heating are about 10-15 sq. meters may exceed the cost of the purchased equipment in 2 years. From a hygienic point of view, a self-made electric underfloor heating is also unsafe.
Electric floor heating (wires) forms electromagnetic fields that negatively affect the human body. A big disadvantage is that an electric warm floor can destroy the outer coating, parquet is more susceptible to impact.
Installing the thermostat
A thermostat should be used to save energy and make the underfloor heating more efficient. It must be installed before laying the heating elements. It is mounted in a convenient place, stepping back from the floor at least 30 cm. In the wall, you need to make a niche for installing the box and draw a strobe to the base of the floor, in which a corrugation or pipe is placed. The corrugation should pass another 0.5-1 m along the base of the floor, connecting wires from the heating elements are placed in it.
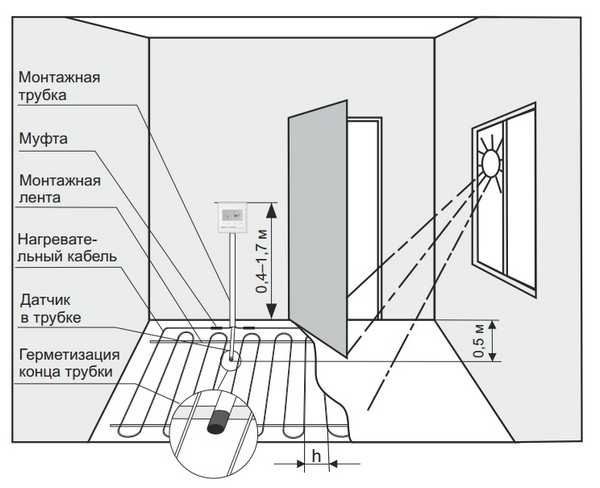

The right place to mount the thermostat
The cable ends must be brought into the thermostat in such a way that the sleeves remain in the tie.
How to install a carbon underfloor heating
H2_2
In order to properly install a warm carbon floor, no special skills are required. Do-it-yourself electric underfloor heating installation is performed in the following sequence:
- All the necessary materials are being prepared - carbon mat, thermostat-thermostat, couplings, heat-reflecting material and bitumen insulation. A control unit is also required;
- The dimensions of the surface area on which the heat-reflecting material will need to be placed are determined. It is being laid;
- After that, you need to put and spread the carbon mat, place the temperature sensor in the corrugated pipe;
- Lay the carbon rods evenly over the prepared surface and connect them together;
- The carbon mats are fixed with masking tape, the thermostat is installed. The control unit is connected to the thermostat;
- Power wires and a cable that provides grounding are connected to the thermostat;
- The thermostat is connected to the electrical network;
- Next, apply a cement screed evenly, the thickness of which will be 2-3 cm. After 28 days, you can make the finishing and start the warm floor.
A simplified diagram of connecting a rod underfloor heating looks like this: "power grid - heating rods - thermostat".
Features and rules of operation
When operating a core underfloor heating, the following rules must be observed:
- The first start-up of the system is carried out after the screed or tile adhesive is completely dry, that is, not earlier than 28 days after the completion of installation;
- When installing or replacing thermostats, turn off the power supply;
- The strips of the core mat must not be stacked on top of each other;
- Before switching on, the heating mat must be unrolled and laid on the heated surface. It is forbidden to turn it on until the installation is complete - it will fail;
- It is forbidden to turn on the core floor without preliminary isolation of the contacts and cut lines;
- It is advisable to equip the electrical panel with a separate machine or switch that will protect the system in the event of short circuits or loads;
- It is forbidden to use a warm floor to dry wet surfaces;
- During operation, it is recommended to set the maximum heating temperature no more than 30 ° C;
- It is forbidden to cover the heating surface with metal sheets;
- It is unacceptable to start the system without first connecting it to the thermostat.
Cabling
There are several options for routing cables:
- snail;
- snake;
- double or triple snake.

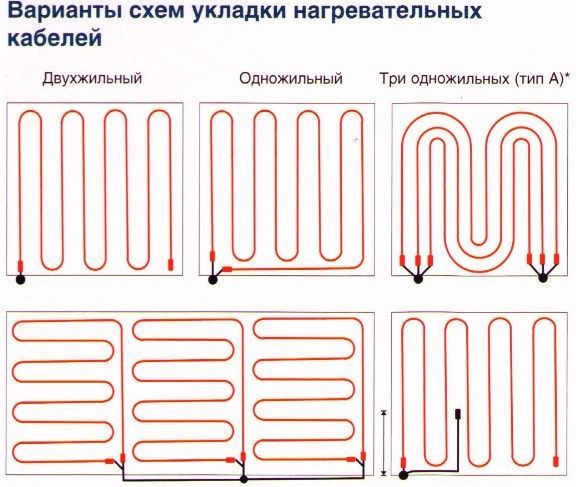
Heating cable routing options
The snail layout is less popular, especially if resistive elements are used. The step between the turns is chosen independently, depending on the required power per 1 m2. The minimum allowable distance is 5 cm, the maximum is 30 cm.
How can you calculate the required amount of wire per m2?
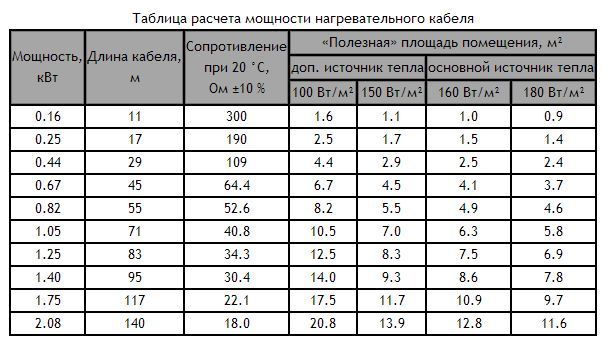

Heating cable power calculation table
- First, you need to decide whether it will be the main heating in the room or auxiliary. If the main one, then you need to provide a power of 150 W and higher, and when the warm floor is only an additional system, 110 W will be enough.
- Secondly, the degree of floor insulation is taken into account - if this is an apartment on the first floor, then you need to provide 140-150 W, even with additional heating. More powerful elements should be installed on the balcony or loggia - up to 180 watts.
- Thirdly, the definition of the heated area is approximately 70% of the floor, taking into account the location of the furniture (the wire does not fit under it).
The cable length can now be calculated. For example, the coverage area is 10m2, it is necessary to organize a power of 140 W per 1m2. There is a heating cable for underfloor heating with a power of 16 watts. We calculate the maximum consumption: 140 * 10 = 1400 W. Determine the length of the cable: 1400/16 = 87.5 m. Now you need to select such a number of coils or sections that are as close as possible to this value, since shortening the heating cable for a warm floor is very problematic.
What if there is a lot of heating mat?
If we take DEVI heating mats, there are several types of them, differing in power output and insulation. There is a widespread DTIR-150 with Teflon inner insulation, where 150 is the power output W / m2. at 230 V, max. operating temperature 90C, there is DTIF-150, where internal and external Teflon insulation, max. operating temperature 110C is DTIF-200, this is the same DTIF-150, but cut off in production from some standard length and is obtained with increased power per running meter, which adds up to 200 W / sq.m. Because heating mats have good Teflon insulation, high operating temperature, this allows you to increase the installed power by removing all the loops from the base mesh and shifting it with a smaller step or cutting it off, reducing the resistance and increasing the linear power up to 200 W / m2.
With a heating cable, almost the same, by decreasing the laying step, we increase the installed power up to max. for heating systems through the floor for indoor premises 220 W / sq.m. But the heating cable can only be shortened no more than 5-10% of its length, otherwise its operating temperature will sharply increase, and the max. working temperature for heating cables is 65C.So, let's say a temperature of 45C on the cable will halve its overall service life by aging the plastic. But under normal operating conditions of the heating cable in the floor up to 35C, its estimated service life in the concrete floor will be at least 50 years. Why is this figure 50 years old? This is the average life of a residential building without overhaul and the work of the heating cable is comparable to it.
According to the installed power with a heating cable or mat. Much has been written about this, and all the same, customers, installers of heating systems make the same mistakes. They begin with a misunderstanding that any heating system begins with the calculation of heat loss. Open any western video, you will see that any electric, hydraulic heating system through the floor is mounted on thermal insulation. There it is a building norm. Here, unfortunately, they first fill everything with concrete, and then they begin to think about how to get warm now and so that they can pay inexpensively during operation. A good part of the allocated power is simply spent on heating concrete floors, evaporates through walls and windows. Let's first think about thermal insulation, and then about the choice of heating equipment.
If you buy a box with a heating cable at the store, you must clearly understand that the heating area indicated on the box is calculated on the basis of 130 W / m2. This is the minimum built-in capacity for the "Underfloor heating" systems, where it is, as an additional to the existing heating system, for the internal rooms of the intermediate floor without thermal insulation, it is also the minimum price for a product of the minimum required length. Take the following cable length and you can't go wrong.
For wet rooms, such as a bathroom, you need to increase the built-in power to 160-180 W / m2. Smaller, minimum 130 W / m2. very often in the off-season, when the main centralized heating has not yet been turned on, it may not cope with a warm floor, like heating in a bathroom, where the heated floor area can be several times smaller than the total area of the bathroom. Tactilely, you will feel cold walls, even standing on a warm floor, a bunch of examples when a mat of 150 W / m2 is laid in the bathroom at 230 V, and at 220 V the power already drops to 137 W / m2. In other rooms without thermal insulation in the floor, when the mains supply voltage drops, on which the power output of the heating cable depends, I also recommend calculating the installed power of 160-180 W / m2. The power reserve on the cable will never be superfluous, all the same, the floor temperature is limited by the thermostat, and the system can quickly reach its temperature mode with lower total consumption.
For loggias and balconies, the first and main question is thermal insulation in the floor. If you simply lay a heating cable on the balcony slab, and even with a normal power of 130 W / m2, then you will never heat the floor surface to a comfortable temperature in winter. Go out to smoke in slippers, yes, but don't make a comfortable office. Unfortunately, there are many mediocre rollers on the network for laying the heating cable on the balcony on penofol, as on thermal insulation. Thermal insulation for underfloor heating starts from 20 mm from EPS. On balconies, it is advisable to install thermal insulation min. 50 mm, but not 3-4 mm of foil insulation, which works to reflect heat in the air, but not in the solid environment of the screed. The power of the heating cable on the balcony should be set to a maximum of 180-220 W / m2 in order to get a comfortable warm floor and the system will work like a full heating, overcoming the inevitable mad heat loss.
So, remember a few numbers when choosing a heating cable or mat. It is necessary to divide the total power indicated on the box or product by the heated area. If you get 130 W / sq.m. this is a minimum or a cable for thermal insulation, if 160-180 W / m2 comes out. this is good for all interiors, for loggias and balconies it should be about 200 W / sq.m.
How to shorten the cable?
The question of how to shorten the heating cable may arise in the event that the incorrect calculation of the footage is performed, and there is nowhere to put the excess (you must remember the minimum allowable distance between the turns - 5 cm). The wire is sold in coils that have several sections. Couplings are installed at the cable ends in the section. A certain resistance is created within each section. If you cut the wire yourself, the balance will be upset: the resistance will decrease, the current will increase.
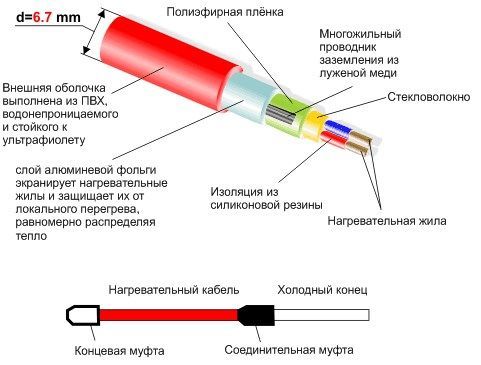

Heating cable information diagram
As a result, the cable will simply burn out, so you should use the entire footage for the coverage. But if, nevertheless, such a need arose, then it is better to entrust the pruning to a professional. It will determine how much resistance is lost and install a current limiting resistor to compensate.
